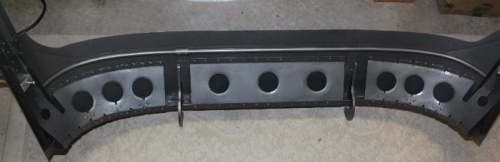
Rustoleum Hammered Grey spray can. Took the canopy frame outside and painted it grey. Also painted the canopy glare shield skin grey on bottom and primer white on top. Later, after canopy has been fitted, I will mark and paint the top of the glareshield black where it will be inside of the canopy. Painted the 3 canopy reinforcement pieces grey and riveted the six reinforcement connectors in place on the outer two pieces. Finally, I riveted the whole canopy frame together. Riveted the skin to the frame, then riveted the three reinforcement pieces to the frame and skin. Only had to drill out two poorly set rivets. Not bad. After completing the riveting, I used the hammered grey and touched up the bucking bar scrapes and all the rivets. I left out the aft two rivets on each side of the glare shield so I can slip a piece of steel in there to protect the canopy frame when I dremel trim a line to match up to the side skin piece later. I did not do anything with the rear F-631 bow yet either. After I set the canopy in place, I can then push the rear bow out snug against the canopy and final rivet the joining plate that connects the two F-631 halves. It all looks really good and I am so glad to move on now to the canopy. Wow.