
|

|
|
|
Wendells RV-6A
|
Date: 3-8-2011
|
Number of Hours: 4.00
|
Manual Reference: Flap Construction
|
Brief Description: Left Flap Bottom Skin-Ribs-Attach Hardware
|
|
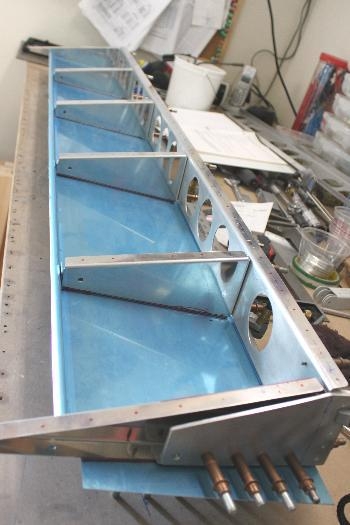
This time around, I used a scrap angle trimmed to 7 9/16 inches to check plan measurement number one. This determines placement of flap spar on the bottom skin. 7 9/16 across the tooling holes from inside rear of bottom skin to rear of flap spar. Got it. Match drilled ribs to bottom skin. Squared up the ribs, clamped them to flap spar and drilled 2 #30s through the spar into the matching rib flanges. End ribs get 3 #30s through the spar into the flanges. Fitted the flap attach hardware, re-bent the large aluminum plate to fit exactly and drilled the assembly to the front spar first, including the forward rib flange holes. Then clamped rear of the small 063 angle in place and drilled through the bottom skin, bottom rib flange and 063 angle. Clecoed rear hole just drilled, moved forward, ditto, through all five holes. Then, with that done, I match drilled through the side of the large plate into the side of the 063 angle. 5 holes #30. The rear most hole will get enlarged to 1/4 to accept the flap bearing.
Removed the hardware and with the plate and 063 angle still clecoed, I used the drill press to enlarge the rear hole to 1/4. All that is left after I eventually rivet the forward angle to the spar is to match drill 5 holes into it through the large side piece as I rivet those two together. There is slightly less than 1/8 inch extra skin on the bottom skin forward of the spar that I will trim off before drilling the flap hinge. That will be done later, after I clamp the flap on the wing to get an exact match to the aileron and the existing 1/2 hinge already attached to the flap brace.
|
|
Slow, methodical, referring to plans all the time.
|
|

Using measurement templates instead of eyeballing rulers.
|
|

Very satisfied with the finished hardware attachments.
|
|
|
|
|
|
|
|
|
Copyright © 2001-2024 Matronics. All Rights Reserved.
|