Bottom line is that I had 2 leaks on the left tank.
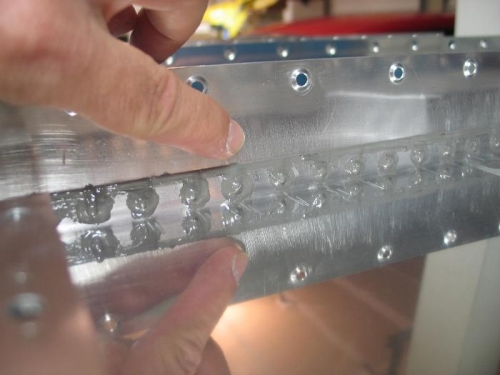
The first was between the baffle and tank skin in the middle of the tank. Soapy water showed bubbles poping like mad. Image one shows the location. For the test I did NOT have sealant on the baffle joint or on the baffle rivet shop heads. I had questions about the way I sealed the baffle so I wanted to test with out sealant on the outside to see just how good the inside seal was. Durring the baffle sealing I actually remember a small bead of sealant, and thought I should increase it but didn't. This is where the leak was.
The fix. Drill out 7 baffle rivets. use a this feeler guage to push sealant inbetween the the baffle and skin. Create a small vacume in the tank to suck it up. Re rivet using sealant on the manufacture heads. Seal the baffle and skin joint and every baffle shop head.
The second was from a rivet manufactured head. Commonly known as a weeping rivet. It was the second rivet from the leading edge on the bottom side.
The fix. Dill out the rivet. The rivet manufactured head just stays stuck to the sealant on the inside of the tank. It does not drop off to the bottom of the tank. I enlarged the hole and took a few turns of the counter sink to take a MK-319 pulled rivet. I used a syringe to squeeze a bunch of sealant in the hole. Coated the rivet in sealent and pulled it. I think this is a very effective way to seal a weeping rivet.