
|

|
|
|
Marlins Web Site
|
Date: 7-25-2023
|
Number of Hours: 8.00
|
Manual Reference: N/A
|
Brief Description: Nose-Gear Nose-Job
|
|
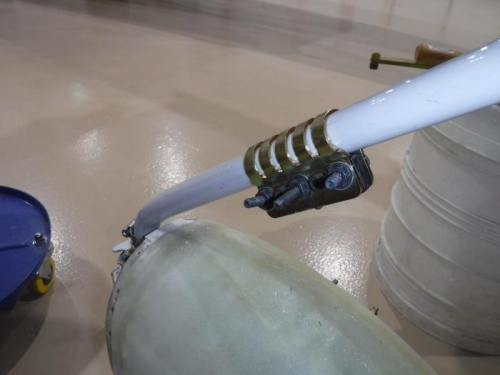
Some time ago, I read about issues landing an RV in high grass. I don’t know how many people have folded the nose gear, but as a recommendation from a friend, I decided to purchase a nose gear stiffener. The stiffener I purchased is from an Aero Splat and is called “The Nose Job”. The Nose Job 2 stiffener arrived last week and today I began installation (see pic #1). The first step is to install a hardened steel clamp using some bent bolts and a welded spacer. Even with the bent bolts, I still needed to use a vice grip to squeeze the clamp enough to get the nuts started onto the bolt threads. If you are using my website to install your own Nose Job, don’t do what I did to shape the clamp by installing it upside down. Even though it’s easier to get the bolts into the clamp, even the slightest amount of tensioning makes it so you can’t rotate the clamp to its final position on the gear leg. So, to preclude taking everything apart once you’ve got the bent-bolt nuts started, I would recommend you start with the clamp in its downward facing position. Next, I used a vice grip to loosely hold the clamp halves together, removed the bent bolts and spacer; inserted the stiffener and straight bolts; torqued to 150 inch/pounds; and voila; I had a new Nose Job! I thought I was receiving a new fairing with the Nose Job, but sadly I have to use my VAN’s supplied fairing. Tomorrow I will tackle the fairing issues I know I will have with this stiffener installed.
|
|
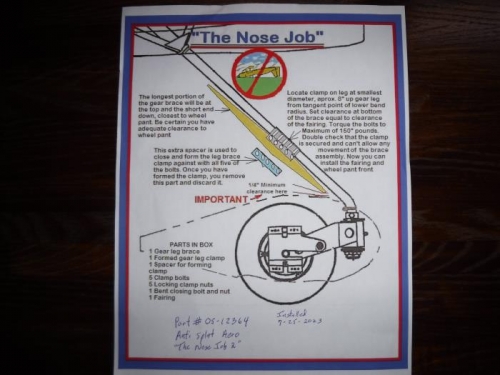
Nose Job Instructions
|
|
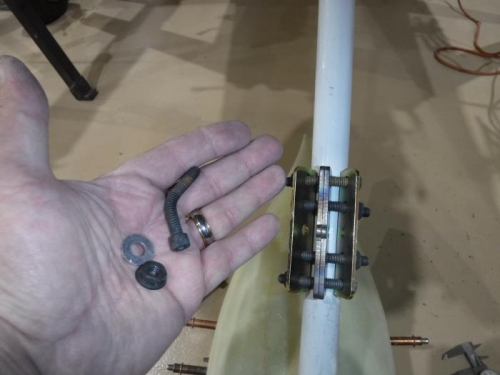
Wrong Way to Install Clamp
|
|
Correct Way To Install
|
|
|
|
|
|
|
|
|
Copyright © 2001-2024 Matronics. All Rights Reserved.
|