I cant say why I didnt realize I had issues with this wig wag set up until now but Im glad it was found, solved, and fixed. I think its better off now and should be more reliable as well.
Problem one was I had two resistors wired in for both the taxi light and the landing HID light when only the HID light required a resistor. The second resistor caused the flasher unit to flash all the time with master switch on and everything else off. So I removed that resistor.
Problem two was figuring out why the flasher unit would work fine with one resistor and then stop working properly. We used some regular light bulbs on my bench and tried this or that and when we thought it was solved, installed in plane and had issues still. After some wire swapping, we figured out the problem and had it working. But that is when problem 3 appeared.
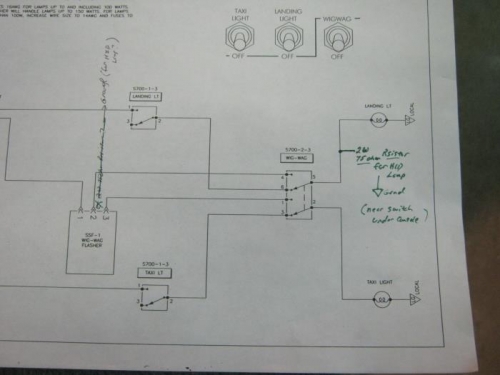
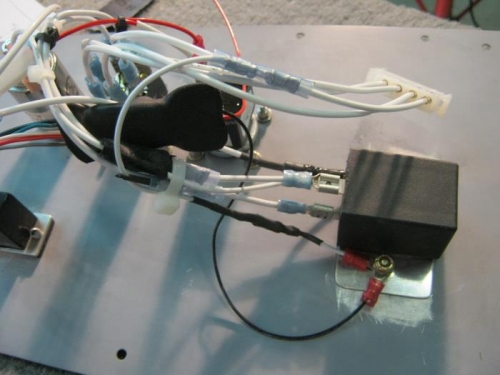
Problem 3 was how hot the resistor was getting wired in the manner described by another builder from vans airforce. With the resistor wired and grounded between the flasher unit and the wig wag switch, It would get hot even though the wig wag and lights were off. It was still getting some slight power overbleeding from the relay for unknown reason. To solve this, it was suggested by Mike Smith (builder and kit logger) to move the resistor to the out put to lamp side of the wig wag switch.Doing this would remove any power to the resistor in daylight flight and then would only warm up when the landing light is on such as during wig wag operation or when landing light is on. I agreed because the other option would require an additional switch to turn off the flasher or extra expense for a solid state flasher which wouldnt require a resistor. Picure 1 and 2 shows where the resistor was moved to. We tested and it works as desired.
Another potential problem was the fact I had painted the underside of the console cover and covered the grounding points. Not good! So I scraped and sanded several areas for clean contacts to ground.
I then loosened and removed the switches, repainted,