
|

|
|
|
RVGator
|
Date: 4-22-2011
|
Number of Hours: 4.00
|
Manual Reference:
|
Brief Description: Installed shunt and ANL
|
|
Spent the entire day working on the plane but half the day was either running to the hardware store or researching something on line. Four hours of actual work out of 8 total, not very efficient.
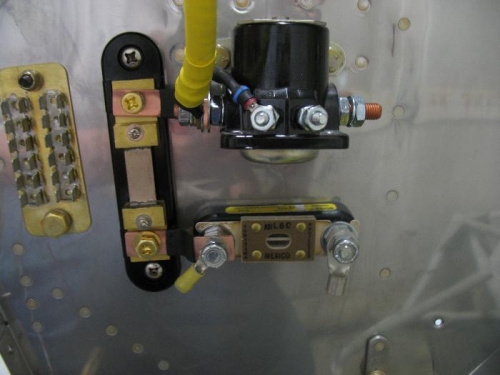
Today I wanted to get the shunt and ANL in place before the engine mount is permanently installed. I had to move the ANL position. In most set ups the ANL is the last thing before the main bus, the shunt used to read amperage is usually before the ANL. Well that is for a single alternator setup or where one has the ability or want to look at two amperages. I have two alternators but one is just a standby, it only produces power when the main alternator malfunctions or is turned off, so I only need one ammeter and my EMS will only support one. Now, one could set up a switch which would allow one ammeter to look at two amp sources but since there should only be source working at a time the addition of a switch set up seems like a waste. At any rate, I had to move the ANL, luckily I had not installed the shunt until today so I only had two holes to plug with high temp RTV, and the holes are behind the shunt now.
If you look at the photo you can see two ring terminals on the ANL (current limiter used instead of a cockpit circuit breaker). The yellow ring will connect to the standby alternator and the other is the main alternator. This way to the ANL blows the standby can still supply the main bus with power. The ANL protects the main alternator wire and I will use a fusible link to protect the wire that goes to the standby alternator.
Long day but hopefully I am getting closer to putting it up on the gear, tonight I will think about what else I want to get done on the firewall before installing the engine mount. I am thinking I may put on the main gear and weight the tail down, this puts the firewall up at a better working height, then after I am done with firewall items I can then install the engine mount and nose gear.
|
|
|
|
|
|
|
|
|
|
|
Copyright © 2001-2024 Matronics. All Rights Reserved.
|