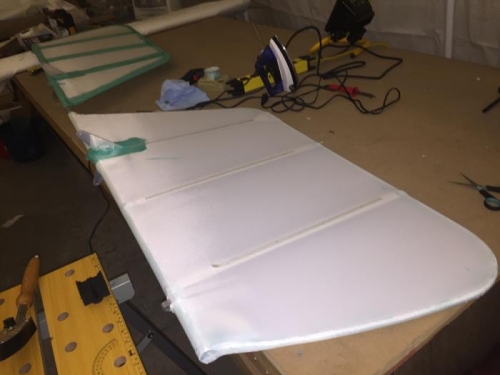
Finished the tape around the parameter of the left side of the elevator. Moved to the right side and cut out the fabric for both sides. Attached the fabric to the bottom side of the frame and ensured that the overlap was correct all the way around. Secured the fabric to the bottom of the elevator and then pulled tight over the remainder of the frame. Used the small iron to anchor the fabric to the frame. Double checked the tension of the fabric around the frame and reset any areas which needed additional tension. Removed the excess material around the frame and ironed the fabric further around the frame. Cut a reinforcing patch for the elevator horn. Glued the patch in place and wiped the excess glue from the patch with a paper towel. Allowed the patch to dry.
Applied the first ironing of the fabric at 250 degree. Marked the perimeter of the frame with a pencil about 3/4 inches from the edge. Applied glue to the fabric within the marked area and allowed to dry.
Turned the elevator over and laid out the second fabric covering of the elevator. Double checked the position of the fabric and secured the bottom edge to the bottom of the elevator. Pulled the material tight across the elevator frame and secured with a pass of the small iron. Cut the excess fabric from the edge of the elevator and ironed it in place. Cut a patch for the elevator horn and glued it in place. Allowed the patch to dry. Tensioned the fabric with the regular iron set at 250 degrees.
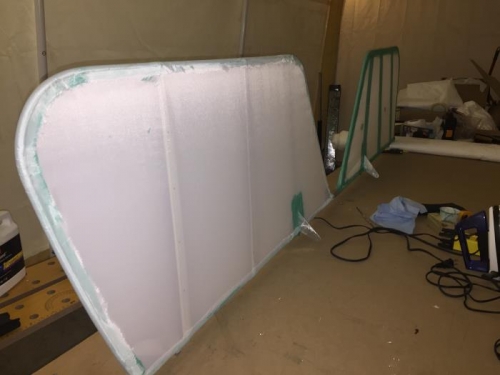
Laid the elevator flat on the table applied reinforcing tape on the fabric over the stitch holes. End of day.