
|

|
|
|
Conrads X-10 Build Log
|
Date: 1-23-2010
|
Number of Hours: 3.00
|
Manual Reference: 39-8 and 39-9
|
Brief Description: SECTION 39 CONTROL SYSTEM, Page 39-8, Step 1 to 3
|
|
SECTION 39 CONTROL SYSTEM, Page 39-8, Step 1 to 3
Step 1 to 3, Completed page 39-8 as specified by the plans/instructions …..
Time 2 hours
SECTION 39 CONTROL SYSTEM, Page 39-9, Step 1 to 6
Step 1, I adjusted the width of the F-1065 Pushrod Assembly until the dimension between the Control Sticks was 22 and 1/4 inches.
Step 2, I bolted the F-1064 Aileron Pushrod Assemblies into the W-1011-L/R Control Stick Bases using the hardware called out for in figure 3 on page 39-8.
Step 3, I am purchasing the Dynon Skyview flight MPD with a Dynon auto-pilot. So I ordered and received the “builder” kit bracket so that actual installation of the Dynon autopilot servo unit will be much easier.
Step 4, This Dynon servo bracket attaches to the F-1035 Battery Bellcrank Mount as shown in figure 3.
Step 5, I bolted the (bottom) F-1090 Elevator Pushrod Asembly to the bottom of the F-635 Elevator Bellcrank with a AN3-10A bolt, AN960-10 washer, and AN365-1032 nut and torque to 28 in/lbs.
Step 6, Finally I bolted the (top) F-1091 Elevator Pushrod Assembly to the F-635 Elevator Bellcrank using the hardware shown in figure 3.
Time about 1 hour.
|
|
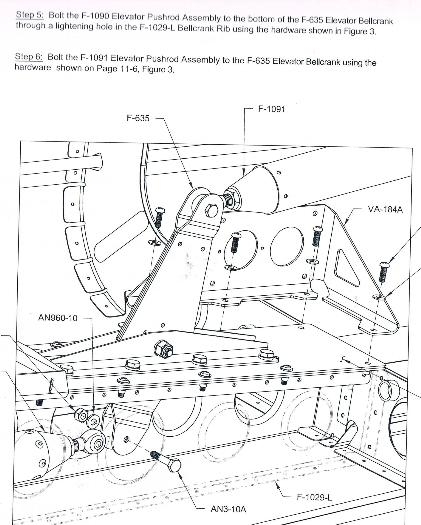
Assembly Diagram for CONTROL SYSTEM, Page 39-9, Step 2 to 6
|
|
|
|
|
|
|
|
|
Copyright © 2001-2024 Matronics. All Rights Reserved.
|