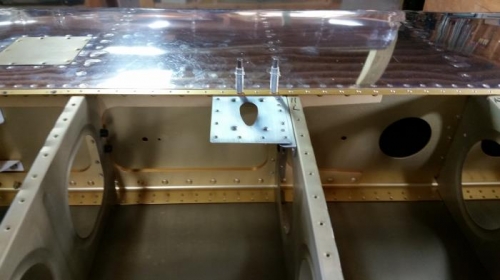
Brief Description: Decided to install the Pitot tube mounting bracket
Spent most of the day laying out the location for the Pitot tub mount. Drilled and fabricated a stand off brace to attach to one of the ribs. After drilling the mount to the brace, I riveted the brace to the rib. Used a counter sink to set the rivets thru the mount to the brace. Match drilled the upper holes in the mount to the main spar, then riveted the mount to the brace. This left no clecoes in the way to locate the bottom skin over the mount. I placed the skin on and used a sharpie to draw the cutout location for the tube to go thru. Removed the skin and used a drimmel to remove most of the tub cut out. finished up with a deburring wheel to the final size. Reinstalled the skin and test fit the pitot tube. While installed, I marked for the mounting holes on the inside of the skin, removed the skin and drilled the final mounting holes. Final test fit of the skin and pitot tube with the screws installed. All fit perfict. I then drilled out the remaining holes leading from the inboard rib to the pitot tube location to 7/16. This allowed for snap bushings to be installed. Next was to run the 2 plastic Safe Air pitot lines thru the snap bushings. Also allowed a service loop at the exit location.