Up to this point all we have done is improve on the design and setup of the ship. Now that all the slop has been removed and the shafts aren't flopping around, and the fuel tanks are ridgid, we can start balancing.
HOVER - At this point you will have set up your Lead/Lag and headshift to 0. You will not need to redo these if you have done them properly, so forget about them. I am going to assume that you have mounted the trim tabs and that they are in the same relative position, with the trailing edge of the tab even with the trailing edge of the blade. This must be measured with the Dial Indicator not the eye ball.
Set up your tracking lights and adjust the tracking as close as possible using pitch links.
From here all adjustments will be only to Lateral Reading so no need to even measure Vertical
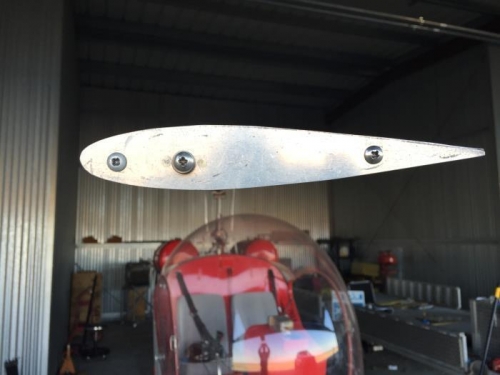
Go into a hover and measure the Lateral. The measurement tells you where the HEAVY side is. Weight is added to the OPPISITE side. Start with small weights on the blades and note how the ips change with weight. There should be a linear relationship between ips and added weight. In Image 1 the center screw in engaged in a nut plate and serves as the mounting point for the weights. I had to remake my blade end plates out of .065" to get rid of deflection.
After making the change do a rerun and note the resluts and redo. You will eventurally be adding weights to both the blades and the chordwise in order to zero in on your lowest ips.
I would not quit until I got it consistently under .2 ips in hover. I am consistently under 0.1 ips in hover.