
|

|
|
|
Serenity
|
Date: 12-22-2006
|
Number of Hours: 4.50
|
Manual Reference:
|
Brief Description: Rear spar riveted, started rib prep
|
|
Riveted all 4 doublers onto each spar. Great care must be taken to only rivet certain holes now, as many will be done later when aileron brackets, etc. are attached. After studying the plans, I outlined all the holes that need to be left alone (see pic 1 - another option is to cover them with tape), and additionally kept clecoes in them. The rivets vary, so I marked call outs from the plan on the spar. No mistakes. Next, start the ribs - arrrgh! This will be a fairly boring task - 15 ribs, 14 nose ribs per wing, all needing deburring, fluting, seaming. I sorted them all out in order for each wing after careful plans study, then numbered them with a system to keep them in proper sequence and orientation. Pic 3 shows all of them in order for one wing - in back the main ribs that will span from front to rear spar, leading edge nose ribs on front left, and fuel tank nose ribs on right. The fuel tank occupies the inboard 2/5 of the leading edge of the wing (note the absence of lightening holes to prevent excess fuel sloshing. There is a small hole on the inside bottom edge hidden from view in the pic by the flange).
|
|
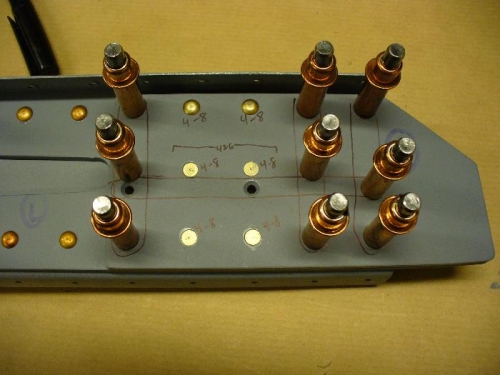
Riveted doubler plates
|
|

|
|

Ribs for left wing - nose ribs in front, fuel tank nose ribs on right.
|
|
|
|
|
|
|
|
|
Copyright © 2001-2024 Matronics. All Rights Reserved.
|