
|

|
|
|
Buck's RV-8
|
Date: 8-21-2007
|
Number of Hours: 3.50
|
Manual Reference:
|
Brief Description: Landing light; tiedown; wing wiring
|
|
Touched up the paint on the lens mounting strips, then riveted the platenuts to the strips. Removed protective tape from lens. Attached mounting strips to the inside of the lens using two-sided tape. (As with the previous wing, this tape is somewhat defective. The adhesive layer on one side actually comes off the tape as the paper backing is removed.) Dimpled the #6 screw holes in the wing skin.
Attached foam tape to the edge of the the HID bulb, then mounted the bulb to the mounting plate. Plugged in bulb and secured the wiring along the side of the ballast unit. Installed entire assembly in wing and adjusted the mount angle. Installed anti-chafe covering on the landing light wiring where it passes near the edge of the rib lightening hole.
Installed lens. The fit came out pretty well, with less than a 1/16" gap on the sides at the leading edge of the wing. Good enough. (And, as luck would have it, it matches the left wing.)
Installed wiring through the wing conduit for the landing light (22 AWG), strobe light (multi-conductor), and LED nav lights (22 AWG).
Installed LED power puck on end rib.
Tapped the tiedown hole with a 3/8" - 16 tap, 1 inch deep, then test-fit the titanium tiedown ring.
|
|
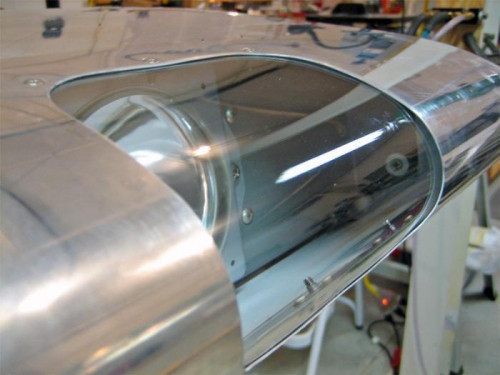
The lens fits pretty well. Not perfect, but close enough.
|
|
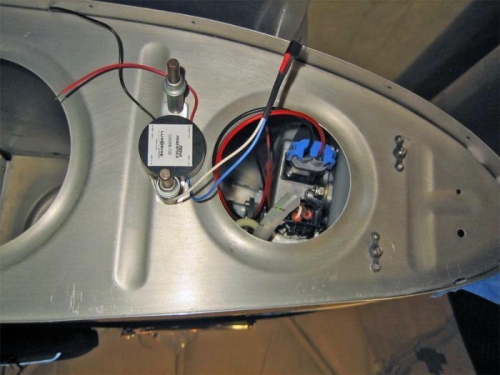
Power puck for the LED nav light, mounted on the end rib.
|
|

Tapping the tiedown hole.
|
|
|
|
|
|
|
|
|
Copyright © 2001-2024 Matronics. All Rights Reserved.
|