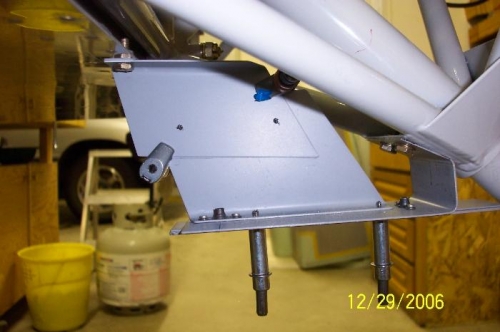
We are back from Arizona for the Holidays so I continue with the Exit Air Attach bracket construction. The first thing I had to do is to widen the cut for the front gear leg on the lower cowling. Without this it is very difficult to remove the lower cowling from the airplane. I also had to add a bit to the depth of the cut. The next step is to make the R/1/8" bend on the U620B so the flange fits against the lower gusset on the engine mount gear socket. I didn't want to mess up my good part, so I made a duplicate piece of the U620B and determined the location of the bend. Made several attempts at this until I felt it was the best fit I can make. This was back breaking work under the airplane, in a cold garage. Transferred this location on the original piece and made the bend. Guess what; in spite my preparatory work I had to move the location of the bend twice, but finally all is looking great. Drilled the two #40 holes on the U-620B as per plans and made a template for locating the holes on the gear socket. It is impossible to match drill the holes on the gear socket using the U-620B part. The bends make it impossible to get a drill in position to make the holes. Clamped the template to the lower gusset on the engine mount gear socket and drilled the two holes. Checked for alignment. It all came out perfect. Drill all the holes to #12. Install the assembled Exit Air Bracket on the engine mount gear socket using temporary nuts and bolts. Next I drilled the #12 hole on the U-720 piece, removed the appropriate rivet from the firewall flange and drilled the hole to #12 as per plans. Installed the U-720A on the firewall flange, positioned the U-720A and U-720B for best fit, clamped and drilled the rivet holes. This came out really great. Next step is to paint and rivet the pieces together and install on the airplane. This whole process took about 3 days off and on in a cold garage. Painting will have to wait for a bit warmer weather. To accomplish this task one has to remove and reinstall the lower cowling many times.