
|

|
|
|
Stevens Web Site
|
Date: 8-15-2006
|
Number of Hours: 2.20
|
Manual Reference:
|
Brief Description: Finally figured out the flap brackets
|
|
After scratching my head for three days, I finally called Vans and Ken helped me see how the flap bracket was supposed to look. The key is carefully cutting the FL-406A part from the 2" x 1.5" aluminum angle in the kit. First, you need to mark your cut carefully. The 2" side of the angle is not cut at a 90 degree angle. Look closely at the drawings and you will see that you cut that side at a 95 degree angle, forming sort of a parallelogram. This angle allows the bracket to fit the angled cut of the end of the inboard flap spar (look at it closely and you will see that it is angled at the inboard end, not cut 90 degrees). Once these 95 degree cuts are made, complete the cuts on the short side (1.5" side) of the angle, which are cut 90 degrees to the edge (only the 2" side is cut like a parallelogram, the 1.5" side is cut square to the edge). Now, you should have a cut angle approximately 2-7/8" long. Before you cut the short side (the 1.5" side) down to 7/8", as per the drawings, you must first bend the angle to 88 degrees. At first this sounds hard, but it is a snap. Just place the angle into a vise and give it a squeeze till it gets down to 88 degrees. Cut out a cardboard 88 degree angle to check your bend. Once the angle is squeezed down, now you can cut the short side to 78". The hard part is now over. Next, cut the FL-406B plate just like the drawing. Then, cut out the FL-406C angle from the 3/4" x 3/4" -12' angles that came with the longerons. CAUTION: DO NOT CUT THE 15' LONGERONS. You will then need to taper one side of this angle down to 9/16". Now it is time to begin fitting all of these parts together. First, take out enought clecoes so that you can fit the FL-406A flap angle to the inboard end of the flap spar. You should still have the top and bottom skins on the ribs and spar so that you can locate the inboard flap rib (FL-404R) to the spar (it should not have been drilled out yet). Next, mark out the #30 holes that are to be drilled onto the long side of FL-406A. Once these ho
|
|
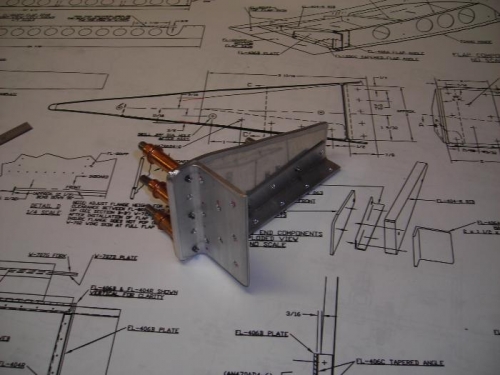
The flap actuator bracket
|
|
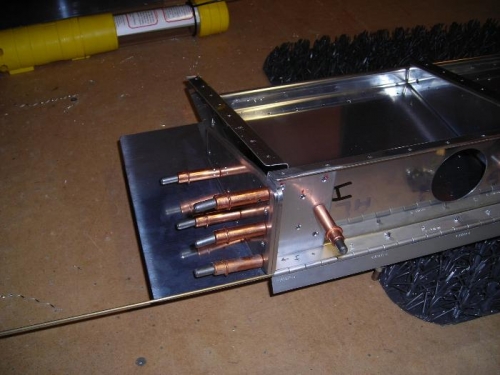
The bracket, clecoed to the flap spar
|
|
|
|
|
|
|
|
|
Copyright © 2001-2024 Matronics. All Rights Reserved.
|