3) Clean with Sika 205 (USA number 226) as per Technical Data Sheet allow to dry.
4) Apply spacers (3/8" square cut from spacers used in the canopy trim/cut) with super glue -Top Tip. Before gluing the spacers find the correct height on the frame so that the Sikaflex nozzle when cut at position "1" does not touch the spacer when you run it touching the frame and the inside of the canopy. I glued mine too high and as a result I could not acheive a continuous smooth fillet. It's good enough though - remember the phrase "Better is the enemy of good enough!"
5) Apply a second layer of electrical tape (red in photo 1) directly over the edge tape to stop primer getting on the edge tape.
6) Prime with Sika 209N (USA number 209D) as per Technical Data Sheet. I used a small brush for the frame and 1/2" one for the canopy. Remove the tape for a nice clean primer line - remember that Sikaflex will only stick to primed surfaces.
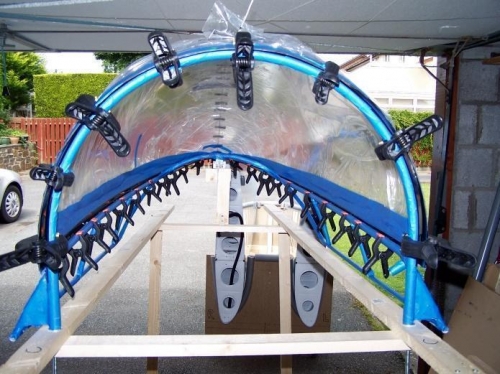
7) After 30 minutes Robin (my youngest) and I placed the canopy onto the frame. Checked centreline with pre marked lines and fore/aft (suggest the notch for the canopy latch and lines above each rib) then clamp at every spacer. Run the Sikaflex nozzle inside the canopy along the frame to check the spacers are not interfereing. They can still be trimmed at this stage and will allow for a really good continuous fillet.
8) Apply Sikaflex 295UV (Black) as per Technical Data Sheet. You may find this video helpful. If the link is broken Google. This first application was just to the top and the arch. The next session will do underneath followed by a cosmetic session.