
|

|
|
|
Bobs Ten
|
Date: 9-14-2019
|
Number of Hours: 2.50
|
Manual Reference:
|
Brief Description: Install Avionics Panel
|
|
1530 - 1800
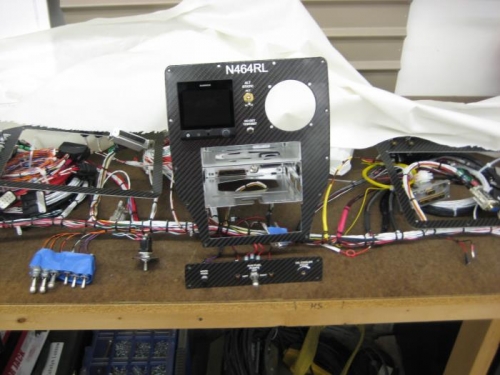
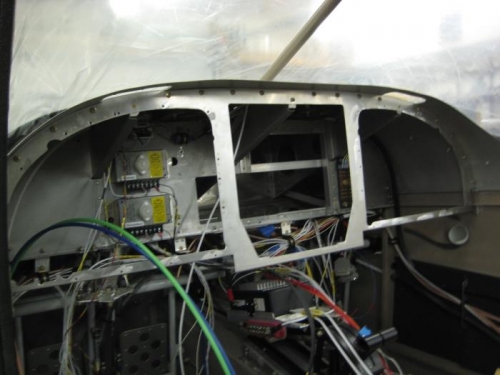
Today was the beginning of the avionics panel install. As beautiful as the panel was assembled, unfortunately, I had to disassemble a good portion of it. No wiring was disconnected except where there was a connector, and it was necessary. The reason for the disassembly was to liberate the Aerosport aluminum sub panel. This panel is secured to the aircraft just as the standard panel is. The CF panel, and all of the avionics, are then attached to this panel. Unfortunately, all of the aluminum panel's mounting screws are hidden behind the CF panel. This requires mounting the aluminum panel first, so I had to disasseble a portion of the panel assembly to facilitate this.
First, the screens and radios were removed from the panel or their trays.
I then needed to remove the three panel inserts and the center lower switch panel.
The primary switch bank on the left side would not pass through the panel hole as an assembly, so the switches were removed from the switch panel.
The center insert then needed to be rotated to fit through the CF panel opening. It was then an easy task to pass the insert through the aluminum sub panel, as the opening is larger than the insert.
The aluminum sub panel was then separated from the CF panel and wiring harness.
Next, the aluminum sub panel was fastened to the fuselage using the hardware specified in the plans for the standard instrument panel.
A plan is now being developed for installing the remaining LRUs prior to CF panel installation.
|
|
|
|
|
|
|
|
|
|
|
|
|
Copyright © 2001-2024 Matronics. All Rights Reserved.
|