Date
|
Hours
|
Work Log Summary

|
Details
|
07-15-2018
|
0.00
|
Hooker Harnesses for sale
|
Details
|
")
|
|
01-16-2018
|
0.00
|
Batteries for sale
|
|
")
")
|
|
05-17-2017
|
0.00
|
SkyView VHF radio for sale
|
|
")
")
|
|
01-23-2017
|
0.00
|
Sensinich prop for sale
|
|
")
")
|
|
09-25-2016
|
0.00
|
Landing touchdown
|
|
")
|
|
04-06-2016
|
0.00
|
200 Kt Club
|
Details
|
")
")
|
|
03-05-2016
|
0.00
|
Kelli Girl
|
|
")
")
")
|
|
02-20-2016
|
0.00
|
tug 2
|
|
")
")
|
|
02-20-2016
|
0.00
|
tug 1
|
|
")
")
")
|
|
11-22-2015
|
0.00
|
b
|
|
")
")
")
|
|
11-21-2015
|
0.00
|
a
|
|
")
")
")
|
|
11-20-2015
|
0.00
|
c
|
|
")
")
")
|
|
11-19-2015
|
0.00
|
b
|
|
")
")
")
|
|
11-18-2015
|
0.00
|
a
|
|
")
")
")
|
|
11-17-2015
|
0.00
|
d
|
|
")
")
")
|
|
11-16-2015
|
0.00
|
c
|
|
")
")
")
|
|
11-15-2015
|
0.00
|
b
|
|
")
")
")
|
|
11-14-2015
|
0.00
|
a
|
|
")
")
")
|
|
11-11-2015
|
0.00
|
d
|
|
")
")
|
|
11-10-2015
|
0.00
|
c
|
|
")
")
")
|
|
11-09-2015
|
0.00
|
b
|
|
")
")
")
|
|
11-08-2015
|
0.00
|
a
|
|
")
")
")
|
|
11-06-2015
|
0.00
|
b
|
|
")
")
")
|
|
11-05-2015
|
0.00
|
a
|
|
")
")
")
|
|
11-04-2015
|
0.00
|
D
|
|
")
")
")
|
|
11-03-2015
|
0.00
|
C
|
|
")
")
")
|
|
11-02-2015
|
0.00
|
b
|
|
")
")
")
|
|
11-01-2015
|
0.00
|
A
|
|
")
")
")
|
|
07-28-2015
|
0.00
|
panel
|
|
")
")
|
|
07-28-2015
|
0.00
|
caddy
|
|
")
")
")
|
|
07-20-2015
|
1.00
|
Houston's first flight in N260KM
|
|
")
")
")
|
|
07-18-2015
|
0.00
|
First Phase II flight, with Kelli
|
|
")
")
")
|
|
04-07-2015
|
2.00
|
DAR Mel Asbury issues N260KM it's Airworthiness Ce
|
Details
|
")
")
")
|
|
03-30-2015
|
1.00
|
Washing her down, getting ready for inspection
|
Details
|
")
")
")
|
|
03-27-2015
|
3.00
|
First engine start, systems test run
|
Details
|
")
")
")
|
|
03-26-2015
|
2.50
|
Randy Richmond's Pre-inspection
|
Details
|
")
")
")
|
|
03-25-2015
|
1.00
|
Pilot's Operating Handbook--POH
|
Details
|
")
|
|
03-25-2015
|
3.00
|
Clean-up items
|
Details
|
")
")
")
|
|
03-22-2015
|
3.00
|
Calibrating fuel level, looking for leaks, part 2
|
Details
|
")
")
|
|
03-22-2015
|
4.00
|
Calibrating fuel level, looking for leaks, part 1
|
Details
|
")
")
|
|
03-20-2015
|
3.00
|
Rewiring the flap position sensor
|
Details
|
")
")
")
|
|
03-16-2015
|
1.00
|
Tire fairing doors for air pressure checks, part 2
|
Details
|
")
")
|
|
03-16-2015
|
3.00
|
Tire fairing doors for air pressure checks, part 1
|
Details
|

")
")
|
|
03-15-2015
|
3.00
|
Weight & Balance, part 2
|
Details
|
")
")
|
|
03-15-2015
|
2.00
|
Weight & Balance, part 1
|
Details
|
")
")
")
|
|
03-15-2015
|
2.00
|
Copilot Function kill switch
|
Details
|
")
")
")
|
|
03-09-2015
|
2.00
|
Mounted/tested ELT, sealed fuselage center ribs
|
Details
|
")
")
")
|
|
03-09-2015
|
2.00
|
Firewall pass-through, oil drain magnet
|
Details
|
")
")
|
|
02-26-2015
|
3.00
|
Wingtip lights, part 4
|
Details
|
")
")
")
|
|
02-25-2015
|
2.00
|
Wingtip lights, part 3
|
Details
|
")
")
")
|
|
02-24-2015
|
3.00
|
Wingtip lights, part 2
|
Details
|
")
")
")
|
|
02-24-2015
|
1.50
|
Right wingtip rib
|
Details
|
")
")
")
|
|
02-18-2015
|
3.00
|
Wingtip lights, part 1
|
Details
|
")
")
")
|
|
02-12-2015
|
2.00
|
Safety tape, stall warning, wing root fairings
|
Details
|
")
")
")
|
|
02-12-2015
|
1.00
|
New fuel line -- right wing to fuel tank valve
|
Details
|
")
")
")
|
|
02-12-2015
|
2.00
|
Left wingtip light cover
|
Details
|
")
")
|
|
02-09-2015
|
4.00
|
Wingtip aft edge, edge alignment
|
Details
|
")
")
")
|
|
02-09-2015
|
1.00
|
Priming and sanding fiberglass parts, fairings
|
Details
|
")
")
|
|
02-09-2015
|
4.00
|
Left wingtip ribs, platenuts
|
Details
|
")
")
")
|
|
02-08-2015
|
3.00
|
Filling pinholes
|
Details
|
")
")
|
|
02-05-2015
|
3.00
|
Wingtip reinforcements
|
Details
|
")
")
|
|
02-03-2015
|
2.00
|
Wing trailing edge adjustments, part 2
|
Details
|
")
")
")
|
|
02-03-2015
|
2.00
|
Wing trailing edge adjustments
|
Details
|
")
")
")
|
|
01-27-2015
|
1.00
|
Fitting the wingtips, part 2
|
Details
|
")
")
")
|
|
01-27-2015
|
3.00
|
Fitting the wingtips, part 1
|
Details
|
")
")
")
|
|
01-27-2015
|
2.00
|
Connecting the aileron trim
|
Details
|
")
")
")
|
|
01-21-2015
|
1.00
|
Installing the ailerons, part 2
|
Details
|
")
")
|
|
01-21-2015
|
3.00
|
Installing the ailerons, part 1
|
Details
|
")

(Click Here to view Full Log Entry)")
")
|
|
01-20-2015
|
2.00
|
Flap extension sensor, part 2
|
Details
|
")
")
")
|
|
01-20-2015
|
2.00
|
Flap extension sensor, part 1
|
Details
|
")
")
")
|
|
01-19-2015
|
3.00
|
Building the jack stands
|
Details
|
")
")
")
|
|
01-17-2015
|
2.00
|
Building the wing root fairings, part 2
|
Details
|

")

(Click Here to view Full Log Entry)")
|
|
01-17-2015
|
3.00
|
Building the wing root fairings, part 1
|
Details
|
")
")
")
|
|
01-16-2015
|
3.00
|
Flap actuator connections, seals
|
Details
|
")
")
")
|
|
01-10-2015
|
1.00
|
Zip-tying firesleeve around the oil cooler return
|
Details
|
")
|
|
01-10-2015
|
2.00
|
New fuel valve and lines, part 1
|
Details
|
")
")
")
|
|
01-10-2015
|
0.00
|
Moving to Location #5, part 2
|
Details
|
")
")
")
|
|
01-10-2015
|
2.00
|
Moving to Location #5, part 1
|
Details
|
")
")
")
|
|
01-05-2015
|
0.00
|
Winter gear
|
Details
|
")
")
|
|
01-05-2015
|
2.00
|
Flap arm hole seals
|
Details
|
")
")
")
|
|
01-03-2015
|
2.00
|
Hanging the flaps
|
Details
|
")
")

(Click Here to view Full Log Entry)")
|
|
01-03-2015
|
3.00
|
Flaps: Fit and Trim
|
Details
|
")
")
")
|
|
01-03-2015
|
1.00
|
Flap actuator arms
|
Details
|
")
")
|
|
12-31-2014
|
2.00
|
Re-plumbing the fuel lines, part 3
|
Details
|
")
")
")
|
|
12-31-2014
|
0.50
|
Re-plumbing the fuel lines, part 2
|
Details
|
")
")
")
|
|
12-31-2014
|
2.00
|
Re-plumbing the fuel lines, part 1
|
Details
|
")

(Click Here to view Full Log Entry)")
|
|
12-31-2014
|
1.00
|
Connecting the fuel level electrical leads
|
Details
|
")
")
|
|
12-28-2014
|
1.00
|
Tapping the forward access panels' screw holes
|
Details
|
")
")
|
|
12-28-2014
|
1.00
|
Installing the aircraft identa-plate
|
Details
|
")
")
|
|
12-28-2014
|
1.00
|
Applying the N-number decals
|
Details
|
")
")
")
|
|
12-28-2014
|
1.00
|
Applying the "Experimental" decal
|
Details
|
")
")
|
|
12-27-2014
|
3.00
|
Riveting the Forward Skin to the airplane, Part 2
|
Details
|
")
")
")
|
|
12-27-2014
|
2.00
|
Riveting the Forward Skin to the airplane, Part 1
|
Details
|
")
")
|
|
12-24-2014
|
2.00
|
Forward Access Panels redux
|
Details
|
")
")
")
|
|
12-24-2014
|
2.00
|
Countersinking the Forward Access Panels' screw ho
|
Details
|
")
")
")
|
|
12-18-2014
|
3.00
|
Riveting the access panel doublers to the forward
|
Details
|
")
|
|
12-18-2014
|
1.00
|
ProSealing the aft window edge
|
Details
|
")
")
")
|
|
12-18-2014
|
1.00
|
Intersection Fairings FAIL -- Follow-up
|
Details
|
")
|
|
12-18-2014
|
2.00
|
Creating the ProSeal gasket for the access panels
|
Details
|
")
")
")
|
|
12-15-2014
|
3.00
|
Screws & Platenuts for the forward access panels
|
Details
|
")
")
")
|
|
12-10-2014
|
3.00
|
Matchdrilling the doubler and skin (continued)
|
Details
|
")
")
|
|
12-10-2014
|
2.00
|
Dimpling the forward skin access panel rivet holes
|
Details
|
")
")
|
|
12-08-2014
|
1.50
|
Cutting the access panel holes, part 2
|
Details
|
")
")
|
|
12-08-2014
|
1.00
|
Cutting the access panel holes, part 1
|
Details
|
")
")
|
|
12-08-2014
|
2.00
|
Access Panel Doubler rivet holes
|
Details
|
")
")
")
|
|
12-01-2014
|
4.00
|
Removing the top forward fuselage skin
|
Details
|
")
")
|
|
12-01-2014
|
2.00
|
Designing the forward access panel templates
|
Details
|

")
")
|
|
12-01-2014
|
2.00
|
Cutting and shaping the doublers, part 1
|
Details
|
")


|
|
11-29-2014
|
1.00
|
Running the wing pitot/AOA tubing
|
Details
|
")
")
")
|
|
11-29-2014
|
1.00
|
Preparing the pitot probe for install
|
Details
|
")
")
")
|
|
11-29-2014
|
0.50
|
Pitot/AOA plumbing final connection
|
Details
|
")
")
")
|
|
11-29-2014
|
1.00
|
Installing the pitot probe to the left wing
|
Details
|
")
")
")
|
|
11-28-2014
|
2.00
|
Wing fuel vent lines
|
Details
|
")
")
")
|
|
11-26-2014
|
2.50
|
Torquing the wing bolts
|
Details
|
")
")
")
|
|
11-26-2014
|
1.00
|
Bolting, safety wiring the fuel tank attach bracke
|
Details
|
")
|
|
11-22-2014
|
0.00
|
Wing cradle
|
Details
|
")
|
|
11-22-2014
|
0.50
|
Permanently mating Wings to Fuselage, Part 5
|
Details
|
")
")
")
|
|
11-22-2014
|
2.00
|
Permanently mating Wings to Fuselage, Part 4
|
Details
|
")
")
")
|
|
11-22-2014
|
1.00
|
Permanently mating Wings to Fuselage, Part 3
|
Details
|
")
")
")
|
|
11-22-2014
|
1.50
|
Permanently mating Wings to Fuselage, Part 2
|
Details
|
")

|
|
11-22-2014
|
1.00
|
Permanently mating Wings to Fuselage, Part 1
|
Details
|
")
")
")
|
|
11-20-2014
|
3.00
|
Intersection Fairings, part 3 -- FAIL
|
Details
|
")
")
|
|
11-19-2014
|
1.50
|
Propeller final installation
|
Details
|
")
")
|
|
11-19-2014
|
1.00
|
Leg Fairing alignment pins
|
Details
|
")
")
|
|
11-14-2014
|
3.00
|
Intersection Fairings, part 2
|
Details
|
")
")
")
|
|
11-14-2014
|
3.00
|
Intersection Fairings, part 1
|
Details
|
")
")
")
|
|
11-09-2014
|
0.00
|
Free Box
|
|
")
|
|
11-06-2014
|
0.50
|
Nose Fairing, part 3
|
Details
|
")
")
")
|
|
11-06-2014
|
2.00
|
Nose Fairing, part 2
|
Details
|
")
")

|
|
11-06-2014
|
1.00
|
Exhaust pipe repair
|
Details
|
")
")
|
|
11-05-2014
|
3.00
|
Nose Fairing, part 1
|
Details
|
")
")
")
|
|
10-31-2014
|
1.50
|
Installing Wheel Pants, part 9
|
Details
|
")
|
|
10-31-2014
|
0.50
|
Installing Wheel Pants, part 8
|
Details
|
")
")
")
|
|
10-31-2014
|
3.00
|
Installing Wheel Pants, part 7
|
Details
|
")
")
")
|
|
10-30-2014
|
1.50
|
Installing Wheel Pants, part 6
|
Details
|
")
")
")
|
|
10-30-2014
|
2.00
|
Installing Wheel Pants, part 5
|
Details
|
")
")
")
|
|
10-29-2014
|
0.50
|
Installing Wheel Pants, part 4
|
Details
|
")
|
|
10-29-2014
|
1.00
|
Installing Wheel Pants, part 3
|
Details
|
")
")
|
|
10-29-2014
|
1.50
|
Installing Wheel Pants, part 2
|
Details
|
")
")

|
|
10-29-2014
|
2.50
|
Installing Wheel Pants, part 1
|
Details
|
")
")
")
|
|
10-23-2014
|
1.50
|
Aligning the leg fairings, Part 2
|
Details
|
")
")

(Click Here to view Full Log Entry)")
|
|
10-23-2014
|
2.50
|
Aligning the leg fairings, Part 1
|
Details
|
")
")
")
|
|
10-22-2014
|
4.00
|
Gear Leg Fairing shimmy dampeners
|
Details
|
")
")
")
|
|
10-20-2014
|
3.00
|
Man Gear Fairings -- Installing the piano hinge pa
|
Details
|
")
")
|
|
10-20-2014
|
2.00
|
Cowling/Spinner clearance check
|
Details
|
")

")
|
|
10-17-2014
|
3.00
|
Man Gear Fairings -- Installing the piano hinge
|
Details
|
")
")
")
|
|
10-16-2014
|
0.50
|
Sam Toy, of Kaiser Airlines (prop bolts)
|
Details
|
")
")
")
|
|
10-16-2014
|
0.50
|
Prop Spinner Installation, part 3
|
Details
|
")
")
")
|
|
10-16-2014
|
0.50
|
Canopy Guides, fuel tank drain fairings
|
Details
|
")
")
|
|
10-16-2014
|
2.00
|
Aligning the Leg Fairings
|
Details
|
")
")
|
|
10-11-2014
|
1.50
|
Spinner prop hole backing plates, part 3
|
Details
|
")
")
|
|
10-11-2014
|
1.50
|
Prop Spinner Installation, part 2
|
Details
|
")
")
|
|
10-11-2014
|
1.50
|
Prop Spinner Installation, part 1
|
Details
|
")
")
|
|
10-10-2014
|
2.00
|
FAB Snorkel, final install
|
Details
|
")
")
")
|
|
10-09-2014
|
2.00
|
Spinner front plate
|
Details
|
")
")
")
|
|
10-08-2014
|
2.50
|
Spinner prop hole backing plates, part 2
|
Details
|
")
")
")
|
|
10-08-2014
|
1.50
|
Spinner prop hole backing plates, part 1
|
Details
|
")
")
|
|
10-05-2014
|
3.00
|
Redux: Left Intake Snorkel mount, part 3
|
Details
|
")
")
|
|
10-05-2014
|
2.00
|
Prop Install, part 2
|
Details
|
")
")
")
|
|
10-05-2014
|
1.50
|
New fuel line, oil quickdrain
|
Details
|
")
")
|
|
10-01-2014
|
2.00
|
Prop install, part 1
|
Details
|
")
")
")
|
|
10-01-2014
|
0.00
|
Loki, our new hangar dog
|
Details
|
")
|
|
09-26-2014
|
1.00
|
Canopy Sun Shade
|
Details
|
")
")
|
|
09-26-2014
|
3.00
|
Anti-Splat nose gear brace, tow bar lugs
|
Details
|
")
")
")
|
|
09-25-2014
|
3.00
|
Redux: Left Intake Snorkel mount, part 2
|
Details
|
")
")
|
|
09-21-2014
|
1.00
|
Cowling platenuts
|
Details
|
")
")
|
|
09-21-2014
|
2.00
|
Cowling oil door, part 6
|
Details
|
")
")
")
|
|
09-21-2014
|
2.00
|
Cowling oil door, part 5
|
Details
|
")
")
|
|
09-21-2014
|
3.00
|
Cowling heat protection
|
Details
|
")
")
")
|
|
09-19-2014
|
2.00
|
Cowling Paint
|
Details
|
")
")
")
|
|
09-18-2014
|
3.00
|
Cowling oil door, part 4
|
Details
|
")
")
")
|
|
09-17-2014
|
1.50
|
Cowling oil door, part 3
|
Details
|
")
")
|
|
09-17-2014
|
2.00
|
Cowling oil door, part 2
|
Details
|
")
")
")
|
|
09-15-2014
|
2.00
|
Glareshield Pad
|
Details
|
")
")
")
|
|
09-15-2014
|
1.50
|
Cowling oil door, part 1
|
Details
|
")
")
|
|
09-09-2014
|
2.00
|
Installing ignition/spark wires, part 2
|
Details
|

(Click Here to view Full Log Entry)")

(Click Here to view Full Log Entry)")
")
|
|
09-09-2014
|
1.00
|
Alternate Air Door/oil line conflict, Part 2
|
Details
|
")
")
")
|
|
09-09-2014
|
5.00
|
Alternate Air Door/oil line conflict, Part 1
|
Details
|
")

(Click Here to view Full Log Entry)")
|
|
09-08-2014
|
2.00
|
Redux: Left Intake Snorkel mount, part 1
|
Details
|
")
")
|
|
09-08-2014
|
2.00
|
Installing ignition/spark wires, part 1
|
Details
|
")
")
")
|
|
09-08-2014
|
2.00
|
Alternate Air Door, part 1
|
Details
|
")
")
")
|
|
08-29-2014
|
2.00
|
Installing Oil Cooler/hoses and alternate air cabl
|
Details
|
")
")
")
|
|
08-25-2014
|
3.00
|
FAB Snorkel, part 4
|
Details
|
")
")
|
|
08-21-2014
|
2.00
|
Removing the inner crankshaft oil plug (for fixed
|
Details
|
")
")
")
|
|
08-20-2014
|
0.10
|
More blood!
|
Details
|
")
|
|
08-20-2014
|
3.00
|
FAB Snorkel, part 3
|
Details
|
")
")
")
|
|
08-18-2014
|
2.00
|
FAB Snorkel, part 2
|
Details
|
")
")
")
|
|
08-18-2014
|
2.00
|
FAB Snorkel, part 1
|
Details
|
")
")
")
|
|
08-16-2014
|
2.00
|
Top Cowl intake-to-cealing ramps
|
Details
|
")
")
")
|
|
08-16-2014
|
3.00
|
Lower Cowl Intakes' rubber cloth
|
Details
|
")
")
")
|
|
08-13-2014
|
3.00
|
Wired Fuel Flow Transducer, installed blast tubes
|
Details
|
")

(Click Here to view Full Log Entry)")

(Click Here to view Full Log Entry)")
|
|
08-13-2014
|
3.00
|
Footheat air scat tube installation
|
Details
|
")
")
")
|
|
08-12-2014
|
0.10
|
Status Shot
|
Details
|
")
|
|
08-12-2014
|
5.00
|
Baffle rubber cloth install
|
Details
|
")
")
")
|
|
08-07-2014
|
4.00
|
Baffle Walls, part 3
|
Details
|
")
")
")
|
|
07-30-2014
|
3.00
|
Installed cockpit placards and mood lights
|
Details
|
")
")
")
|
|
07-29-2014
|
2.00
|
Misc. Baffle hardware install
|
Details
|
")
")
")
|
|
07-29-2014
|
3.00
|
Baffle Walls, part 2
|
Details
|
")
")
|
|
07-28-2014
|
3.00
|
Baffle Walls, part 1
|
Details
|
")
")
")
|
|
07-26-2014
|
3.00
|
Baffle Intake conical gussets
|
Details
|
")
")
")
|
|
07-25-2014
|
4.00
|
Cleaning up, reassembling the canopy
|
Details
|
")
")
")
|
|
07-24-2014
|
3.00
|
Forward baffles part 4
|
Details
|
")
")
")
|
|
07-20-2014
|
3.00
|
Forward baffles part 3
|
Details
|
")
")
")
|
|
07-19-2014
|
0.10
|
Snoopy Doo's Last Hangar Day
|
Details
|
")
")
|
|
07-18-2014
|
2.00
|
Forward baffles part 2
|
Details
|
")
")
")
|
|
07-18-2014
|
3.00
|
Forward baffles
|
Details
|
")
")
")
|
|
07-10-2014
|
6.00
|
Cowling exterior finished
|
Details
|
")
")
|
|
07-08-2014
|
8.00
|
Finishing the canopy frame
|
Details
|
")
")
")
|
|
07-02-2014
|
2.00
|
Test-fitting all four cylinders' baffles
|
Details
|
")
")
")
|
|
07-02-2014
|
2.00
|
#3 Cylinder baffle
|
Details
|
")
")
|
|
07-02-2014
|
3.00
|
#1 and #2 cylinder baffles, Top engine mount brack
|
Details
|

(Click Here to view Full Log Entry)")

(Click Here to view Full Log Entry)")
|
|
07-01-2014
|
4.00
|
Number 4 baffle and oil cooler, part 2
|
Details
|
")
")
")
|
|
06-29-2014
|
7.00
|
Surface finish/pinhole fill, coat #1
|
Details
|
")
")
|
|
06-29-2014
|
2.00
|
Final cowling fit
|
Details
|
")
")
|
|
06-28-2014
|
3.00
|
Number 4 baffle and oil cooler, part 1
|
Details
|
")
")
")
|
|
06-25-2014
|
3.00
|
Installing the cowling side camlocs
|
Details
|
")
")
")
|
|
06-24-2014
|
2.00
|
Main Fuel Line re-route and protection
|
Details
|
")
")
")
|
|
06-24-2014
|
3.00
|
Fabricating Cyl 4 baffle wall
|
Details
|
")
")
|
|
06-18-2014
|
3.00
|
Oil dipstick, footheat scat tubing
|
Details
|
")
")
")
|
|
06-18-2014
|
3.00
|
Camloc Flange side connections
|
Details
|
")
")
")
|
|
06-17-2014
|
6.00
|
Bottom Cowling Center Brace
|
Details
|
")
")
")
|
|
06-16-2014
|
4.00
|
Top/Bottom Cowl Camloc Stud Holes
|
Details
|
")
")
")
|
|
06-16-2014
|
4.00
|
Top and Bottom Cowl Camlocs
|
Details
|
")
")
")
|
|
06-16-2014
|
2.00
|
Fixing the left side cowling gap
|
Details
|

")
")
|
|
06-01-2014
|
3.00
|
Top Cowl Camlocs, part 1
|
Details
|
")
")
")
|
|
06-01-2014
|
2.00
|
Bottom cowling fitting and trimming, part 3
|
Details
|
")
")
|
|
05-31-2014
|
2.00
|
Bottom cowling fitting and trimming, part 2
|
Details
|
")
")
")
|
|
05-28-2014
|
6.00
|
Bottom cowling fitting and trimming
|
Details
|
")
")
")
|
|
05-27-2014
|
2.00
|
Center floor cover angle channel, part 3
|
Details
|
")
")
")
|
|
05-27-2014
|
2.00
|
Center floor cover angle channel, part 2
|
Details
|
")
")
")
|
|
05-27-2014
|
2.00
|
Center floor cover angle channel, part 1
|
Details
|
")
")
")
|
|
05-24-2014
|
3.00
|
Blocking the top cowling
|
Details
|
")
")
|
|
05-22-2014
|
3.00
|
Cockpit fuel line/wiring floor covers
|
Details
|
")
")
")
|
|
05-22-2014
|
2.00
|
Cockpit air ducting
|
Details
|
")
")
")
|
|
05-21-2014
|
3.00
|
Cowling top half trim/fit
|
Details
|
")

(Click Here to view Full Log Entry)")
")
|
|
05-20-2014
|
2.00
|
Footheat muff installation, part 2
|
Details
|
")
")
")
|
|
05-20-2014
|
2.00
|
Footheat muff installation, part 1
|
Details
|
")
")
")
|
|
05-20-2014
|
2.00
|
Cowling oil door access
|
Details
|
")
")
|
|
05-16-2014
|
2.00
|
Protecting the sniffle valve and throttle cables
|
Details
|
")
")
")
|
|
05-10-2014
|
3.00
|
Riveting on top front fuselage skin, part 2
|
Details
|
")
")
")
|
|
05-09-2014
|
2.00
|
Riveting on top front fuselage skin, part 1
|
Details
|
")
")
|
|
05-04-2014
|
0.00
|
Texas Scottish Festival & Highland Games -- VAF Ha
|
Details
|
")
|
|
04-30-2014
|
2.00
|
Installing the Warning Light CBs, part 2
|
Details
|
")
")
|
|
04-29-2014
|
3.00
|
Installing the Warning Light CBs, part 1
|
Details
|
")
")
")
|
|
04-29-2014
|
2.00
|
Installing the "Red Cube" fuel transducer
|
Details
|
")
")
")
|
|
04-14-2014
|
3.00
|
EMS Sensor wire routing
|
Details
|
")
")
")
|
|
04-04-2014
|
6.00
|
Wiring the EMS Sensors part 1
|
Details
|
")
")
")
|
|
03-25-2014
|
3.00
|
Oil/Air Seperator part 2
|
Details
|
")
")
")
|
|
03-25-2014
|
2.00
|
Oil/Air Seperator installation part 1
|
Details
|
")
")
")
|
|
03-21-2014
|
4.00
|
Installing the Throttle and Mixture cables
|
Details
|
")
")
")
|
|
03-20-2014
|
4.00
|
Installing the alternator and shunt
|
Details
|
")
")
")
|
|
03-19-2014
|
3.00
|
Installing the manifold pressure line and sensor
|
Details
|
")
")
|
|
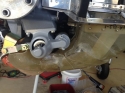
03-19-2014
|
3.00
|
Fuel Pump Overflow and Pressure Sensor connections
|
Details
|
")
")
")
|
|
03-19-2014
|
2.00
|
Fabricating/installing the engine sniffle valve
|
Details
|
")
")
|
|
03-18-2014
|
2.00
|
Installing the Fuel Injector
|
Details
|
")
")
")
|
|
03-12-2014
|
2.00
|
Installing the exhaust pipe hanger supports
|
Details
|
")
")
|
|
03-11-2014
|
2.00
|
Installing the engine exhaust system
|
Details
|
")
")
")
|
|
03-10-2014
|
3.00
|
Throttle/Mixture linkages
|
Details
|
")
")
")
|
|
03-08-2014
|
1.00
|
TEST
|
Details
|
|
|
|
03-06-2014
|
1.00
|
Hanging the Engine part 2
|
Details
|
")
")
")
|
|
03-06-2014
|
4.00
|
Hanging the Engine part 1
|
Details
|
")
")
|
|
03-05-2014
|
2.00
|
Uncrating the engine
|
Details
|
")
")
")
|
|
03-05-2014
|
2.00
|
Prepping the engine for installation
|
Details
|
")
")
")
|
|
02-28-2014
|
3.00
|
SB 14-01-31 part 8, reinstalling the empennage
|
Details
|
")
")
|
|
02-26-2014
|
4.00
|
SB 14-01-31 part 7, match-drilling and riveting th
|
Details
|
")
")
")
|
|
02-26-2014
|
2.00
|
SB 14-01-31 part 6, fabricating the main rib forwa
|
Details
|
")
")
")
|
|
02-25-2014
|
3.00
|
SB 14-01-31 part 5, riveting doublers to the forwa
|
Details
|

(Click Here to view Full Log Entry)")

(Click Here to view Full Log Entry)")
")
|
|
02-25-2014
|
3.00
|
SB 14-01-31 part 4, positioning the spar doublers
|
Details
|
")
")
")
|
|
02-25-2014
|
2.00
|
SB 14-01-31 part 3, main rib forward flange remova
|
Details
|
")
")
")
|
|
02-24-2014
|
2.00
|
SB 14-01-31 part 2, removing forward spar angles
|
Details
|
")
")
")
|
|
02-21-2014
|
4.00
|
SB 14-01-31 part 1
|
Details
|

(Click Here to view Full Log Entry)")
")
|
|
02-19-2014
|
4.00
|
Installing VHF comm antennae
|
Details
|
")

(Click Here to view Full Log Entry)")
")
|
|
02-10-2014
|
3.00
|
Running antennae cables, fuel vent lines
|
Details
|
")
")

(Click Here to view Full Log Entry)")
|
|
02-01-2014
|
2.00
|
Installing Dynon Skyview VHF, part 3
|
Details
|
")
")
|
|
01-25-2014
|
2.00
|
New canopy latch, part 6
|
Details
|
")
")
")
|
|
01-25-2014
|
2.00
|
New canopy latch, part 5
|
Details
|
")
")
")
|
|
01-25-2014
|
1.00
|
Control Sticks: Assembly and wiring part 3
|
Details
|
")
")
")
|
|
01-24-2014
|
3.00
|
New canopy latch, part 4
|
Details
|
")
")
")
|
|
01-24-2014
|
3.00
|
New canopy latch, part 3
|
Details
|
")
")
|
|
01-22-2014
|
2.00
|
New canopy latch, part 2
|
Details
|
")
")
")
|
|
01-22-2014
|
3.00
|
New canopy latch, part 1
|
Details
|
")
")
")
|
|
01-22-2014
|
3.00
|
Installing Dynon Skyview VHF, part 2
|
Details
|
")
")
")
|
|
01-16-2014
|
1.00
|
There will be blood!
|
Details
|
")
")
")
|
|
01-16-2014
|
3.00
|
Installing Dynon Skyview VHF, part 1
|
Details
|
")
")
")
|
|
01-16-2014
|
2.00
|
Foot Heat control cable
|
Details
|
")
")
")
|
|
01-14-2014
|
2.00
|
Parking Brake Cable
|
Details
|
")
")
")
|
|
01-12-2014
|
3.00
|
Spar bulkhead side plate covers, part 2
|
Details
|
")

(Click Here to view Full Log Entry)")
")
|
|
01-08-2014
|
4.00
|
Spar bulkhead side plate covers, part 1
|
Details
|
")
")
")
|
|
12-31-2013
|
3.00
|
Control Sticks: Assembly and wiring part 2
|
Details
|
")
")
")
|
|
12-30-2013
|
2.00
|
Conformal mount, top anti-collision beacon, part 4
|
Details
|
")
")
")
|
|
12-30-2013
|
2.00
|
Conformal mount, top anti-collision beacon, part 3
|
Details
|
")

(Click Here to view Full Log Entry)")
")
|
|
12-26-2013
|
2.00
|
Connecting the rudder to the pedals, part 2
|
Details
|
")
")
|
|
12-26-2013
|
2.00
|
Connecting the rudder to the pedals, part 1
|
Details
|
")
")
")
|
|
12-24-2013
|
3.00
|
Control Sticks: Assembly and wiring part 1
|
Details
|
")
")
")
|
|
12-23-2013
|
2.00
|
Conformal mount, top anti-collision beacon, part 2
|
Details
|
")
")
")
|
|
12-23-2013
|
3.00
|
Conformal mount, top anti-collision beacon, part 1
|
Details
|
")
")
|
|
12-16-2013
|
2.00
|
Control sticks: Final fit, paint
|
Details
|
")
")
|
|
12-13-2013
|
3.00
|
Assembling the sticks
|
Details
|
")
")
")
|
|
11-27-2013
|
1.00
|
Modifying the control stick design, part 2
|
Details
|
")
")
")
|
|
11-27-2013
|
2.00
|
Modifying the control stick design, part 1
|
Details
|
")
")
")
|
|
11-20-2013
|
2.00
|
Prepping the stick grips, cross connectors
|
Details
|
")
")
")
|
|
11-20-2013
|
1.00
|
New switches for the nav lights, beacons, and stro
|
Details
|
")
")
|
|
11-13-2013
|
4.00
|
Forming the canopy fairing
|
Details
|
")
")
")
|
|
11-04-2013
|
4.00
|
Installing the canopy skirts to the canopy frame
|
Details
|
")
")

(Click Here to view Full Log Entry)")
|
|
10-31-2013
|
2.00
|
Install rudder cable outlet covers
|
Details
|
")
")
|
|
10-31-2013
|
2.00
|
Building up canopy frame sides, part 2
|
Details
|
")
")
|
|
10-29-2013
|
4.00
|
Installing the empennage fairing
|
Details
|
")
")
")
|
|
10-23-2013
|
3.00
|
Horizontal stab end caps: Filling, final install
|
Details
|
")
")
")
|
|
10-23-2013
|
3.00
|
Building up canopy frame sides
|
Details
|
")
")
")
|
|
10-15-2013
|
2.00
|
Elevator/push tube connections
|
Details
|
")
")
|
|
10-12-2013
|
2.00
|
Bolted the Rudder into place!
|
Details
|
")
")
|
|
10-08-2013
|
2.00
|
Horizontal Stabilizer end caps
|
Details
|
")
")
")
|
|
10-08-2013
|
2.00
|
Balancing the elevators
|
Details
|
")
|
|
10-03-2013
|
2.00
|
Installing/connecting the elevator trim servo
|
Details
|

(Click Here to view Full Log Entry)")
")
|
|
10-03-2013
|
3.00
|
Bolting on the elevator
|
Details
|
")
")
|
|
08-23-2013
|
4.00
|
Running the elevator trim cable
|
Details
|
")
")
")
|
|
08-20-2013
|
3.00
|
Installing the horizontal/vertical stabilizers
|
Details
|
")
")
")
|
|
08-15-2013
|
3.00
|
Empennage fairing, part 1
|
Details
|
")
")
")
|
|
08-14-2013
|
3.00
|
Vertical Stab Top Cap part 2
|
Details
|
")
")
")
|
|
08-14-2013
|
3.00
|
Empennage fairing, part 1
|
Details
|
")
")
|
|
07-20-2013
|
2.00
|
Elevator end caps, part 2
|
Details
|
")
")
|
|
07-20-2013
|
3.00
|
Elevator end caps
|
Details
|
")
")
")
|
|
07-19-2013
|
3.00
|
Vertical Stab Top Cap
|
Details
|
")
")
")
|
|
06-29-2013
|
1.00
|
Rudder Caps on!
|
Details
|
")
")
")
|
|
06-29-2013
|
4.00
|
Installing the bottom and top rudder caps
|
Details
|
")
")
")
|
|
06-24-2013
|
3.00
|
Routing and connecting the tail light wires
|
Details
|
")
")
")
|
|
06-23-2013
|
3.00
|
Riveting the aft fuselage skins
|
Details
|
")
")
")
|
|
06-17-2013
|
3.00
|
Tail light mounting
|
Details
|
")
")
")
|
|
06-15-2013
|
3.00
|
Fabricating/mounting the tail light mounting brack
|
Details
|
")
")
")
|
|
06-14-2013
|
4.00
|
Fitting the rudder bottom cap
|
Details
|
")
")
")
|
|
05-25-2013
|
2.00
|
Moving N260KM from the Van Cave to our T-hangar
|
Details
|

(Click Here to view Full Log Entry)")
")
|
|
04-25-2013
|
0.00
|
N260KM checks into the Van Cave
|
Details
|
")
")
")
|
|
04-13-2013
|
7.00
|
Prepping the project to ship to Texas
|
Details
|
")
")
")
|
|
03-16-2013
|
1.00
|
Testing the landind and taxi lights
|
Details
|
")
")
|
|
03-16-2013
|
5.00
|
Attaching the wings -- initial attachment
|
Details
|
")
")
")
|
|
02-28-2013
|
8.00
|
Cleaning up the wiring, part 3
|
Details
|
")
")
")
|
|
02-27-2013
|
8.00
|
Cleaning up the wiring, part 2
|
Details
|
")
")
")
|
|
02-27-2013
|
5.00
|
Cleaning up the wiring, part 1
|
Details
|
")
")
")
|
|
02-21-2013
|
2.00
|
Reinforcing the cockpit arm rests, part 2
|
Details
|
")
")
")
|
|
02-19-2013
|
3.00
|
Reinforcing the cockpit arm rests, part 1
|
Details
|
")
")
")
|
|
02-18-2013
|
3.00
|
Transponder antennae
|
Details
|
")
")
")
|
|
01-24-2013
|
2.00
|
Headphone jack brackets part 2
|
Details
|
")
")
")
|
|
01-21-2013
|
3.00
|
Headphone jack brackets part 1
|
Details
|
")
")
")
|
|
01-20-2013
|
3.00
|
Installing the seat cushion wiring
|
Details
|
")
")
")
|
|
12-03-2012
|
3.00
|
Wing root electrical connections
|
Details
|
")
")
")
|
|
12-01-2012
|
3.00
|
VHF antenna: Fuselage holes, doubler plates
|
Details
|
")
")
")
|
|
12-01-2012
|
3.00
|
Cockpit eyeball lights, part 2
|
Details
|
")
|
|
12-01-2012
|
3.00
|
Cockpit eyeball lights, part 1
|
Details
|
")
")
")
|
|
11-17-2012
|
2.00
|
Ethernet pass-through for the avionics sub-panel
|
Details
|
")

(Click Here to view Full Log Entry)")

(Click Here to view Full Log Entry)")
|
|
11-14-2012
|
3.00
|
Fabricate/Install fuel tank attach brackets
|
Details
|
")
")
")
|
|
10-23-2012
|
2.00
|
Elevator push tubes and control column part 2
|
Details
|
")
")

(Click Here to view Full Log Entry)")
|
|
10-22-2012
|
3.00
|
Installed first major firewall electrical pass-thr
|
Details
|

")
")
|
|
10-14-2012
|
3.00
|
Elevator push tubes and control column
|
Details
|
")
")
")
|
|
09-23-2012
|
4.00
|
Installing the Roll Trim servo
|
Details
|
")
")
")
|
|
09-15-2012
|
4.00
|
Wiring the terminal blocks
|
Details
|
")
")
|
|
09-09-2012
|
0.50
|
RV-7 Yoga
|
Details
|
")
")
")
|
|
09-02-2012
|
4.00
|
Cockpit relay terminals
|
Details
|
")
")
")
|
|
08-24-2012
|
4.00
|
Firewall-mounted ground block
|
Details
|
")
")
")
|
|
08-23-2012
|
3.00
|
Hooked up the two Skyview EFIS displays, installed
|
Details
|
")
")
")
|
|
08-19-2012
|
3.00
|
First look at the wiring harness
|
Details
|
")
")
")
|
|
08-09-2012
|
2.00
|
Panel build-up (continued)
|
Details
|
")
")
")
|
|
08-08-2012
|
2.00
|
Installed the pilot/copilot air vent scoops
|
Details
|
")
")
")
|
|
08-07-2012
|
0.10
|
Snoopy patrols the shop
|
Details
|
")
")
")
|
|
08-07-2012
|
0.10
|
Looking like an airplane...?
|
Details
|
")
")
")
|
|
08-07-2012
|
1.00
|
Installing VHF slave, Skyview back-up batteries
|
Details
|
")
")
")
|
|
08-07-2012
|
2.00
|
Installing the VP-X Vertical Power electrical cont
|
Details
|
")
")
")
|
|
08-06-2012
|
2.00
|
Installing the Skyview Transponder Module
|
Details
|
")
")
|
|
08-06-2012
|
3.00
|
Installing Skyview EMS module
|
Details
|
")
")
")
|
|
08-04-2012
|
2.00
|
Installing the heat vent valve part 2
|
Details
|
")

(Click Here to view Full Log Entry)")
")
|
|
08-04-2012
|
2.00
|
Installing the battery box and battery
|
Details
|
")
")
")
|
|
07-31-2012
|
2.00
|
Installing the heat vent valve part 1
|
Details
|
")
")
")
|
|
07-31-2012
|
2.00
|
Installing the engine sensor manifold
|
Details
|
")
")
")
|
|
07-30-2012
|
2.00
|
More firewall platenuts...adel clamp mounts
|
Details
|
")
")
")
|
|
07-29-2012
|
2.00
|
Drilling/installing starter and master solenoids t
|
Details
|
")
")
")
|
|
07-28-2012
|
3.00
|
Building the battery box
|
Details
|
")
")
")
|
|
07-26-2012
|
2.00
|
Installing the backing angle to the new panel
|
Details
|
")
")
|
|
07-23-2012
|
2.00
|
Nose wheel fairing mounting plates
|
Details
|
")
")
")
|
|
07-23-2012
|
0.10
|
Givin' the shop dog a bone
|
Details
|
")
")
")
|
|
07-18-2012
|
3.00
|
Fabricating/installing the wheel brake lines
|
Details
|
")
")
")
|
|
07-18-2012
|
3.00
|
Building, installing nose gear assemblies
|
Details
|
")
")
")
|
|
07-15-2012
|
2.00
|
Mounting wheels
|
Details
|
")
")
|
|
07-15-2012
|
0.10
|
I have the absolute BEST copilot!
|
Details
|
")
")
")
|
|
07-15-2012
|
2.00
|
Assembling the wheel/tire assemblies
|
Details
|
")
")
")
|
|
07-14-2012
|
3.00
|
Modifying the tire fairing mounts
|
Details
|
")
")
")
|
|
07-14-2012
|
3.00
|
Attaching the wheel brake mounts, tire fairing mou
|
Details
|
")
")
")
|
|
07-12-2012
|
2.00
|
Main axle initial assembly
|
Details
|
")
")
|
|
07-12-2012
|
2.00
|
Installing the gear strut mounting bolts
|
|
")
")
")
|
|
07-11-2012
|
2.00
|
Installing the nose gear strut
|
Details
|
")
")
")
|
|
07-11-2012
|
2.00
|
Installing the gear struts
|
Details
|
")
")
")
|
|
07-09-2012
|
2.00
|
Installing the Engine Mount
|
Details
|
")
")
")
|
|
07-07-2012
|
0.10
|
Snoopy the Shop Dog ROCKS!
|
Details
|
")
")
|
|
07-07-2012
|
3.00
|
Installing the rear window
|
Details
|
")
")
")
|
|
07-07-2012
|
2.00
|
Canopy locking mechanisms
|
Details
|
")
")
|
|
07-01-2012
|
4.00
|
Final prep on rear window
|
Details
|
")
")
")
|
|
06-24-2012
|
4.00
|
Riveting Top Fuselage Skin in place
|
Details
|
")
")
")
|
|
06-23-2012
|
2.00
|
Canopy Gas Struts install
|
Details
|
")
")
")
|
|
06-16-2012
|
2.00
|
Roll bar final prep
|
Details
|
")
")
")
|
|
06-01-2012
|
2.00
|
Canopy Side Skirts
|
Details
|
")
")
|
|
05-28-2012
|
3.00
|
Sikaflex-gluing the canopy to the frame...prep wor
|
Details
|
")
")
")
|
|
05-28-2012
|
3.00
|
Sika-Flexing the plexi to the canopy frame...part
|
Details
|
")
")
|
|
05-28-2012
|
2.00
|
Applying the Sikaflex primer to the canopy, fra
|
Details
|
")
")
")
|
|
05-27-2012
|
3.00
|
Canopy Side mount hardware & side skirts
|
Details
|
")
")
|
|
05-25-2012
|
3.00
|
Canopy Frame stiffeners (part 2)
|
Details
|
")
")
")
|
|
05-21-2012
|
3.00
|
Setting the edge bend on the Canopy Frame Stiffene
|
Details
|
")
bent
(Click Here to view Full Log Entry)")
bent, then match-drilled/cleco'd to the frame
(Click Here to view Full Log Entry)")
|
|
05-05-2012
|
3.00
|
THE BIG CUT!!!!
|
Details
|
")
")
|
|
05-02-2012
|
4.00
|
Canopy frame riveting
|
Details
|
")
")
")
|
|
05-01-2012
|
2.00
|
Drawing the "Big Cut" line dividing fore/aft canop
|
Details
|
")
")
")
|
|
04-30-2012
|
3.00
|
Trimming/fitting the canopy to the frame
|
Details
|
")
")
")
|
|
04-15-2012
|
3.00
|
Initial trim on the canopy
|
Details
|
")
")
")
|
|
04-13-2012
|
3.00
|
Canopy frame side rails
|
Details
|
")
")
")
|
|
04-12-2012
|
2.00
|
Mounted rear canopy frame
|
Details
|
")
")
")
|
|
04-11-2012
|
0.10
|
My Prop Came In!!
|
Details
|
")
|
|
04-07-2012
|
3.00
|
Pre-drilling avionics mounts, building up panel su
|
Details
|
")
")
")
|
|
04-07-2012
|
2.00
|
Mounting shelf for the Vertical Power Pro unit
|
Details
|
")
|
|
04-01-2012
|
2.00
|
Autopilot Pitch Servo installed
|
Details
|
")
|
|
04-01-2012
|
3.00
|
ADAHRS shelf mounting, plumbing
|
Details
|
")
")
")
|
|
03-26-2012
|
2.00
|
Mounting SkyView ADAHRS units to the shelf
|
Details
|
")
")
")
|
|
03-24-2012
|
2.00
|
Mounted Dynon Outside Air Temp (OAT) probes in tai
|
Details
|
")
")
|
|
03-24-2012
|
3.00
|
Installing ELT, ELT antenna, cable
|
Details
|
")
")
")
|
|
03-23-2012
|
2.00
|
Building/installing ELT shelf
|
Details
|
")
")
|
|
02-19-2012
|
2.00
|
Ran the static plumbing and shoulder harness cable
|
Details
|
")
")
|
|
02-18-2012
|
1.00
|
Tested the anti-collision beacon
|
Details
|
")
|
|
02-18-2012
|
3.00
|
Installed the Static system ports
|
Details
|
")
")
")
|
|
02-18-2012
|
3.00
|
Autopilot pitch channel: Bracket, wiring
|
Details
|
")
")
|
|
02-08-2012
|
3.00
|
Panel construction, Stark Aviation
|
Details
|
")
")
")
|
|
02-01-2012
|
4.00
|
Fabricating the Skyview ADAHRS shelf
|
Details
|
")
")
")
|
|
01-28-2012
|
2.00
|
Running wires for the fuselage/tail lights, elev t
|
Details
|
")
")
")
|
|
01-25-2012
|
2.00
|
Riveting the anti-collision mount stiffiners to th
|
Details
|
")
")
")
|
|
01-23-2012
|
3.00
|
Beacon fuselage mount stiffiners
|
Details
|
")
")
")
|
|
01-19-2012
|
2.00
|
Side and Rear canopy frame brackets
|
Details
|
")
")
")
|
|
01-16-2012
|
2.00
|
Riveting the forward frame spars
|
Details
|
")
")
")
|
|
01-16-2012
|
2.00
|
Drilling the canopy frame hinge brackets
|
Details
|
")
")

(Click Here to view Full Log Entry)")
|
|
01-15-2012
|
4.00
|
Canopy frame forward skin alignment problems
|
Details
|
")


|
|
01-15-2012
|
2.00
|
Canopy frame forward bracket
|
Details
|
")
")
|
|
01-14-2012
|
1.00
|
Canopy Frame forward skin
|
Details
|
")
")
")
|
|
01-10-2012
|
1.00
|
Canopy Frame Hinge Bracket pins
|
Details
|
")
")
|
|
01-08-2012
|
1.00
|
Forward canopy frame, initial skin alignment
|
Details
|
")
")
|
|
01-08-2012
|
2.00
|
Cockpit lock handle primed, riveted into place
|
Details
|
")
")
|
|
01-08-2012
|
2.00
|
Aft Canopy locking mechanisms, part 1
|
Details
|
")
")
")
|
|
01-07-2012
|
2.00
|
Fabricated and installed canopy lock/release hardw
|
Details
|
")
")
")
|
|
01-07-2012
|
2.00
|
Cutting/drilling canopy lock handle mounts
|
Details
|
")
")
")
|
|
01-05-2012
|
2.00
|
Wire runs for the fuselage
|
Details
|
")
")
|
|
01-05-2012
|
2.00
|
Canopy disconnect assembly
|
Details
|
")
")
")
|
|
01-02-2012
|
2.00
|
Testing the canopy hinge bracket release
|
Details
|
")
")
|
|
01-01-2012
|
2.00
|
Canopy hinge mounting blocks
|
Details
|
")
")
")
|
|
12-26-2011
|
3.00
|
Main Instrument Panel, air vents
|
Details
|
")
")
")
|
|
12-25-2011
|
2.00
|
Positioning mounting brackets for the sub-panel
|
Details
|
")
")
")
|
|
12-25-2011
|
2.00
|
Match-drilling the skins to the sub-panel ribs and
|
Details
|
")
")
")
|
|
12-24-2011
|
3.00
|
Side sub-panel assembly
|
Details
|
")
")
")
|
|
12-24-2011
|
3.00
|
Fitting the sub-panels to the cockpit area
|
Details
|
")
")
")
|
|
12-23-2011
|
2.00
|
Panel component fabrication, part 3
|
Details
|
")
")
|
|
12-23-2011
|
3.00
|
Center Sub-panel assembly, part 2
|
Details
|
")
")
")
|
|
12-23-2011
|
2.00
|
Center Sub-panel assembly, part 1
|
Details
|
")
")
")
|
|
12-22-2011
|
2.00
|
Riveting the stiffiner to the instrument panel
|
Details
|
")
")
|
|
12-22-2011
|
3.00
|
Panel component fabrication, part 2
|
Details
|
")
")
|
|
12-20-2011
|
3.00
|
Panel component fabrication, part 1
|
Details
|
")
")
|
|
12-19-2011
|
2.00
|
Roll Bar top brace/channel
|
Details
|
")
")
|
|
12-19-2011
|
2.00
|
Final-drilling the roll bar mounting brackets
|
Details
|
")
")
")
|
|
12-17-2011
|
3.00
|
Finished/primed, assembled/rivited the roll bar
|
Details
|
")
")
")
|
|
12-17-2011
|
2.00
|
Assembling/mounting the roll bar mount brackets
|
Details
|
")
")
")
|
|
12-11-2011
|
2.00
|
Drilling/fitting the roll channel halves' joining
|
Details
|
")
")
")
|
|
12-11-2011
|
3.00
|
Assembling, drilling the roll bar
|
Details
|
")
")
")
|
|
12-10-2011
|
3.00
|
Fabricating the angles
|
Details
|
")
")
")
|
|
12-04-2011
|
2.00
|
Installing the rudder pedal assembly
|
Details
|
")
")
")
|
|
12-04-2011
|
1.00
|
Finished. Also, had help from neighbor's friend
|
Details
|
")
")
")
|
|
12-01-2011
|
3.00
|
Inventorying the Finishing Kit
|
Details
|
")
|
|
11-28-2011
|
4.00
|
Rebuilding and painting the brake pedals
|
Details
|
")
")
")
|
|
11-26-2011
|
3.00
|
Mounting and fitting the rudder
|
Details
|
")
")
")
|
|
11-25-2011
|
2.00
|
Rear tie-down block, vert stabilizer (part 2)
|
Details
|
")

(Click Here to view Full Log Entry)")
")
|
|
11-25-2011
|
2.00
|
Rear tie-down block, vert stabilizer
|
Details
|
")
")
")
|
|
11-25-2011
|
1.00
|
Attaching the elevator horn up block
|
Details
|
")
|
|
11-23-2011
|
2.00
|
Riveted the front attach plate to the forward spar
|
Details
|
")
")
|
|
11-22-2011
|
3.00
|
Fine-tuning the Vertical Stab, and DRILLING THE HO
|
Details
|
")
")
")
|
|
11-21-2011
|
2.00
|
Mounting the vertical stab
|
Details
|
")
")
")
|
|
11-21-2011
|
3.00
|
Assembled and plumbed the fuel pump and filter
|
Details
|
")
")
")
|
|
11-20-2011
|
2.00
|
Installing platenuts for the fuel pump floor mount
|
Details
|
")
")
")
|
|
11-20-2011
|
2.00
|
Final assembly: Fuel Pump cover doghouse
|
Details
|
")
")
")
|
|
11-19-2011
|
2.00
|
Building the fuel pump cover and floor mounts
|
Details
|

(Click Here to view Full Log Entry)")

")
|
|
11-19-2011
|
1.00
|
Adjusting the forward elevator stop block
|
Details
|
")
")
")
|
|
11-15-2011
|
1.00
|
Installed the elevator bellcrank, connected aft pu
|
Details
|
")
")
|
|
11-15-2011
|
2.00
|
Front elevator push rod
|
Details
|
")
")
|
|
11-15-2011
|
1.00
|
Adjusting the aft elevator pushrod
|
Details
|
")
")
")
|
|
11-14-2011
|
2.00
|
Finished the rear elevator push rod
|
Details
|
")
")
|
|
11-13-2011
|
2.00
|
Elevator push rod (rear half)
|
Details
|
")
")
")
|
|
11-09-2011
|
3.00
|
Building/installing the parking brake
|
Details
|
")
")
")
|
|
11-06-2011
|
2.00
|
Setting the horizontal Stab's angle of incidence
|
Details
|

")
")
|
|
11-05-2011
|
2.00
|
Fabricating shims, mounting/aligning the horiz sta
|
Details
|
")
")
")
|
|
11-05-2011
|
2.00
|
Drilling forward stab, installing shims
|
Details
|
")

(Click Here to view Full Log Entry)")
")
|
|
11-03-2011
|
2.00
|
Match-drilling the elevator horns
|
Details
|
")
")
|
|
10-30-2011
|
2.00
|
Mounting the elevator to align the control horns
|
Details
|
")
")
|
|
10-09-2011
|
4.00
|
Fuel Vent lines
|
Details
|
")
")
")
|
|
10-06-2011
|
0.00
|
Shop Dogs!
|
|

(Click Here to view Full Log Entry)")
")
")
|
|
10-06-2011
|
4.00
|
Constructing/mounting cockpit fuel lines
|
Details
|

")
")
|
|
10-02-2011
|
2.00
|
Installing brake fluid reservoir and fuel tank sel
|
Details
|
")
")
")
|
|
10-01-2011
|
3.00
|
Drilling gear holes, aligning the weldments
|
Details
|
")
")
|
|
10-01-2011
|
2.00
|
Drilling and bolting the weldment side mounts
|
Details
|
")
")
")
|
|
09-30-2011
|
3.00
|
Mounting the flap motor
|
Details
|
")
")
")
|
|
09-30-2011
|
2.00
|
Center Brace, side covers
|
Details
|
")
")
|
|
09-26-2011
|
3.00
|
Platenuts on the flap actuator channel
|
Details
|
")
")
")
|
|
09-26-2011
|
2.00
|
Flap Actuator Channel, top mounting plate
|
Details
|
")
")
")
|
|
09-23-2011
|
3.00
|
Fabricating parts for the flap actuator assemblies
|
Details
|
")
")
")
|
|
09-21-2011
|
1.00
|
Seat Back final assembly, finished
|
Details
|
")
")
")
|
|
09-21-2011
|
3.00
|
Mounting the flap actuator assembly to the 705 bul
|
Details
|
")
")
")
|
|
09-21-2011
|
1.00
|
Drilling the flap actuator arm safety wire hole
|
Details
|
")
")
|
|
09-21-2011
|
3.00
|
Assembling, riveting the seat back braces
|
Details
|
")
")
")
|
|
09-20-2011
|
2.00
|
Fitting the Cockpit Heater baffle to front cockpit
|
Details
|
")
")
|
|
09-19-2011
|
2.00
|
Riveting the heater baffle assembly and platenuts
|
Details
|
")
")
")
|
|
09-18-2011
|
3.00
|
Priming and riveting the seat backs
|
Details
|
")
")

(Click Here to view Full Log Entry)")
|
|
09-18-2011
|
3.00
|
Cockpit heat baffle drilling, assembly
|
Details
|
")
")
")
|
|
09-10-2011
|
3.00
|
Assembling the seat back pieces
|
Details
|
")
")
")
|
|
09-07-2011
|
3.00
|
Seat backs--marking and match-drilling the forward
|
Details
|
")
")
")
|
|
09-05-2011
|
1.00
|
Pop-Riveting the cargo floors and cockpit seat flo
|
Details
|
")
|
|
09-05-2011
|
2.00
|
Assemble mid-cockpit tunnel cover
|
Details
|
")
")
")
|
|
09-01-2011
|
3.00
|
Seatbelt cable wear plates/blocks for aft cargo wa
|
Details
|
")

(Click Here to view Full Log Entry)")
")
|
|
08-31-2011
|
3.00
|
Installing the Cargo Compartment floors
|
Details
|
")
")
")
|
|
08-30-2011
|
2.00
|
Rivet the aircrew steps to the fuselage sides
|
Details
|
")
")
|
|
08-30-2011
|
1.00
|
Anchoring the steps to the fuselage ribs
|
Details
|
")
")
|
|
08-04-2011
|
3.00
|
Installing cockpit steps part 1
|
Details
|
")
")
")
|
|
08-03-2011
|
1.00
|
Top Forward Skin GOOF!
|
Details
|
")

(Click Here to view Full Log Entry)")
|
|
08-03-2011
|
3.00
|
Fitting the top forward skin
|
Details
|

(Click Here to view Full Log Entry)")
")
|
|
08-03-2011
|
1.00
|
Constructing the elevator bellcrank
|
Details
|
")
")

(Click Here to view Full Log Entry)")
|
|
07-31-2011
|
3.00
|
Mid-fuselage bulkhead gusset part 2
|
Details
|
")

(Click Here to view Full Log Entry)")

(Click Here to view Full Log Entry)")
|
|
07-31-2011
|
2.00
|
Mid-fuselage bulkhead gusset part 1
|
Details
|
")
")
")
|
|
07-30-2011
|
2.00
|
Rudder/brake pedals, final assembly
|
Details
|
")
")
")
|
|
07-30-2011
|
3.00
|
Mounting, drilling adjustment holes for the rudder
|
Details
|
")
")
")
|
|
07-30-2011
|
2.00
|
Assembling the rudder/brake pedals
|
Details
|
")
")
")
|
|
07-24-2011
|
4.00
|
Fabricating and prepping the rudder/brake pedals
|
Details
|
")
")
")
|
|
07-23-2011
|
2.00
|
Fabricating the fuselage/fuel tank attachment shim
|
Details
|
")
")
|
|
07-16-2011
|
2.00
|
Fuselage Rotisserie--tail support
|
Details
|
")
")
")
|
|
07-16-2011
|
3.00
|
Fuselage Rotisserie
|
Details
|
")
")
")
|
|
07-16-2011
|
2.00
|
Drilling the main landing gear holes
|
Details
|
")
")
|
|
07-16-2011
|
2.00
|
Crew step holes
|
Details
|
")
")
|
|
07-10-2011
|
2.00
|
modifying the cockpit floor ribs
|
Details
|
")
")
|
|
07-10-2011
|
2.00
|
Installing cockpit floor nutplates
|
Details
|
")
")
|
|
07-10-2011
|
2.00
|
Firewall-mounted fuel boost pump stiffener
|
Details
|
")
")
")
|
|
07-10-2011
|
2.00
|
Fabricating the rudder stops
|
Details
|
")
")
")
|
|
07-09-2011
|
2.00
|
Fab work on cross-cockpit channel trim, part 4
|
Details
|
")
")
")
|
|
07-06-2011
|
2.00
|
Fab work on cross-cockpit channel trim, part 3
|
Details
|
")
")
")
|
|
07-06-2011
|
2.00
|
Fab work on cross-cockpit channel trim, part 2
|
Details
|
")
")
")
|
|
07-05-2011
|
1.00
|
Fab work on cross-cockpit channel trim
|
Details
|
")
")
|
|
07-04-2011
|
3.00
|
Central stick linkage, cockpit floors
|
Details
|
")
")
")
|
|
07-03-2011
|
1.00
|
Snap bushings
|
Details
|
")
")
")
|
|
07-03-2011
|
2.00
|
Prepping the firewall recess
|
Details
|
")
")
")
|
|
07-03-2011
|
2.00
|
Drilling the firewall pass-through holes
|
Details
|
")

(Click Here to view Full Log Entry)")
")
|
|
07-01-2011
|
2.00
|
Moving wings back to storage
|
Details
|
")
")
")
|
|
07-01-2011
|
2.00
|
Hauling in the QB fuselage
|
Details
|
")
")
")
|
|
06-27-2011
|
1.00
|
Wings are done!
|
Details
|
")
")
")
|
|
06-26-2011
|
1.00
|
Right wing bottom skin, part 2
|
Details
|
")
")
|
|
06-26-2011
|
4.00
|
Right wing bottom skin
|
Details
|
")
")
|
|
06-26-2011
|
2.00
|
Re-mounting the ailerons after riveting the lower
|
Details
|
")
")
|
|
06-18-2011
|
4.00
|
Left Wing, bottom skin, part 2
|
Details
|
")
")
")
|
|
06-12-2011
|
4.00
|
Left Wing, bottom skin, part 1
|
Details
|
")
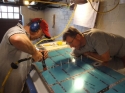
")
|
|
06-12-2011
|
2.00
|
Cutting, drilling skin access for pitot tube
|
Details
|
")
")
")
|
|
06-01-2011
|
1.00
|
EAA Tech Inspection #1
|
Details
|
")
")
|
|
05-30-2011
|
1.00
|
Lower skins primed
|
Details
|
")
|
|
05-30-2011
|
2.00
|
Access panel plate-nuts
|
Details
|
")
")
")
|
|
05-29-2011
|
2.00
|
Prepping the lower outer skin access panels
|
Details
|
")
")
")
|
|
05-28-2011
|
2.00
|
Dimpling wings, prep for lower skins
|
Details
|
")
")
")
|
|
05-28-2011
|
2.00
|
Bottom skin edge prep, dimpling
|
Details
|
")

(Click Here to view Full Log Entry)")
")
|
|
05-27-2011
|
1.00
|
Bevelling the wing bottom skins' edges
|
Details
|
")
")
|
|
05-26-2011
|
2.00
|
Autopilot roll servo harness part 4
|
Details
|
")
")
")
|
|
05-26-2011
|
2.00
|
Autopilot roll servo harness part 3
|
Details
|
")
")
")
|
|
05-21-2011
|
2.00
|
Autopilot roll servo harness part 2
|
Details
|
")
")
|
|
05-21-2011
|
2.00
|
Autopilot roll servo harness part 1
|
Details
|
")
")
")
|
|
05-15-2011
|
3.00
|
Wingtip light trim, lens
|
Details
|
")
")
")
|
|
05-13-2011
|
3.00
|
Wingtip lighting #3
|
Details
|
")
")
")
|
|
05-07-2011
|
2.00
|
Wingtip lighting #2
|
Details
|
")
")
")
|
|
05-07-2011
|
1.00
|
Running Stall Warner wiring
|
Details
|
")
")
|
|
05-05-2011
|
1.00
|
Autopilot roll servo, right wing #2
|
Details
|
")
")
|
|
05-05-2011
|
2.00
|
Autopilot roll servo, right wing #1
|
Details
|
")
")

(Click Here to view Full Log Entry)")
|
|
05-04-2011
|
2.00
|
Wingtip lighting #1
|
Details
|
")
")
|
|
04-16-2011
|
2.00
|
Wing conduit, wires
|
Details
|
")
")
")
|
|
04-09-2011
|
3.00
|
Running wing conduit
|
Details
|
")
")
")
|
|
03-24-2011
|
1.00
|
Light plate installed....finished!
|
Details
|
")
|
|
03-23-2011
|
1.00
|
Landing light bulb mount plate, power supply
|
Details
|
")
|
|
03-23-2011
|
2.00
|
Installing the lense cover
|
Details
|
")
")
")
|
|
03-23-2011
|
2.00
|
Finished mounting the lens cover
|
Details
|
")
")
")
|
|
03-22-2011
|
2.00
|
Mounting screw plates for the landing light mount
|
Details
|
")
")
")
|
|
03-22-2011
|
1.00
|
Match-drilling the lense cover mount strips
|
Details
|
")
|
|
03-20-2011
|
2.00
|
Marked and cut the left wing's landing light hole
|
Details
|
")
")
")
|
|
03-17-2011
|
1.00
|
Final assembly of the wing-mounted portion
|
Details
|
")
")
")
|
|
03-17-2011
|
2.00
|
Assembling the system's electronic component
|
Details
|
")
")
")
|
|
03-16-2011
|
2.00
|
Finishing the leading edge holes, priming
|
Details
|
")
")
")
|
|
03-16-2011
|
2.00
|
Drilling out leading edge holes, mounting access p
|
Details
|
")
")
")
|
|
03-15-2011
|
3.00
|
Sealing the fuel tanks
|
Details
|
")
")
")
|
|
03-15-2011
|
2.00
|
Began installing the stall warning system in left
|
Details
|
")
")
")
|
|
03-13-2011
|
2.00
|
Torquing the tank mount bolts, and prepping the ta
|
Details
|
")
")
")
|
|
03-13-2011
|
2.00
|
Assembling the fuel feed hardware to the tank acce
|
Details
|
")
")
|
|
03-12-2011
|
2.00
|
Mounting the pitot tube bracket (initial metal wor
|
Details
|
")
")
")
|
|
03-12-2011
|
3.00
|
Mounting and aligning the ailerons
|
Details
|
")
")
|
|
03-08-2011
|
2.00
|
dimpling and installing the aileron gap fairing, t
|
Details
|
")
")
|
|
03-07-2011
|
1.00
|
Installing the flap hardware
|
Details
|
")
")
|
|
03-06-2011
|
2.00
|
Installing the aileron's end brackets
|
Details
|
")
")
|
|
03-06-2011
|
3.00
|
Installing flap piano hinges
|
Details
|
")
")
")
|
|
03-06-2011
|
3.00
|
Aileron gap fairings & flap braces, part 3
|
Details
|
")
")
")
|
|
03-05-2011
|
2.00
|
Aileron gap fairings & flap brace, part 2
|
Details
|
")
")
|
|
03-05-2011
|
3.00
|
Aileron gap fairings & flap brace, part 1
|
Details
|
")
")
")
|
|
03-03-2011
|
2.00
|
Installing the aileron brackets
|
Details
|
")
")
")
|
|
03-02-2011
|
2.00
|
Riveting the aileron brackets
|
Details
|
")
")
")
|
|
03-02-2011
|
3.00
|
Building the aileron brackets
|
Details
|
")
")
")
|
|
02-28-2011
|
2.00
|
Rigging the aileron bellcrank
|
Details
|
")
")
")
|
|
02-26-2011
|
3.00
|
Building the aileron tie rods
|
Details
|
")
")
|
|
02-21-2011
|
2.00
|
Trimming horizontal stab spar to clear elevator ho
|
Details
|
")
")
|
|
02-21-2011
|
2.00
|
Trimming horizontal stab end skins to clear the el
|
Details
|
")
")
")
|
|
02-21-2011
|
0.10
|
Tail feathers are done!
|
Details
|
")
|
|
02-21-2011
|
1.00
|
Drilling the elevator horns for the center bearing
|
Details
|
")
")
|
|
02-20-2011
|
2.00
|
Rolling the elevators' leading edges
|
Details
|

(Click Here to view Full Log Entry)")
 setting the pop rivets
(Click Here to view Full Log Entry)")
")
|
|
02-20-2011
|
1.00
|
Installing the elevator bearing eye bolts
|
Details
|
")
|
|
02-19-2011
|
2.00
|
Stiffeners for the new left elevator
|
Details
|
")
")
")
|
|
02-19-2011
|
3.00
|
Riveting left elevator skin to skeleton
|
Details
|
")
")
")
|
|
02-19-2011
|
1.00
|
Installing the electric trim servo
|
Details
|
")
")
|
|
02-19-2011
|
2.00
|
Finishing the trim tab install
|
Details
|
")
")
|
|
02-19-2011
|
3.00
|
Elevator trim tab
|
Details
|
")
")
|
|
02-09-2011
|
2.00
|
Elevator Trim Tab partial assembly
|
Details
|
")
")
")
|
|
02-08-2011
|
2.00
|
Trim Tab assembly
|
Details
|
")

(Click Here to view Full Log Entry)")
")
|
|
02-08-2011
|
2.00
|
Left elevator--riveting the skeleton, Part 1
|
Details
|
")
")
")
|
|
02-08-2011
|
2.00
|
Left elevator--riveting the skeleton Part 2
|
Details
|
")
")
")
|
|
02-07-2011
|
2.00
|
Left Elev: ribs for elevator trim slot
|
Details
|
")
")
|
|
02-07-2011
|
2.00
|
Elev Trim servo mount
|
Details
|
")
")
")
|
|
02-06-2011
|
2.00
|
Left Elevator: Skin fold for trim tab...FAIL
|
Details
|
")
")
")
|
|
02-05-2011
|
2.00
|
Left elevator: Match drill and dimple the skeleton
|
Details
|
")
")
|
|
02-05-2011
|
2.00
|
Left elevator skeleton
|
Details
|
")
")
")
|
|
02-02-2011
|
2.00
|
Riveting right elevator skeleton
|
Details
|
")
")
")
|
|
02-02-2011
|
2.00
|
Right Elevator: riveted elevator horn and skin to
|
Details
|
")
")
")
|
|
01-30-2011
|
2.00
|
Skeleton assembly continued
|
Details
|
")
")
")
|
|
01-30-2011
|
2.00
|
Riveting stiffeners to elevator skins
|
Details
|
")
")
")
|
|
01-30-2011
|
1.00
|
Riveting elevator trim access panel to skin
|
Details
|
")
")
")
|
|
01-30-2011
|
1.00
|
Bending the elevators' skin trailing edges
|
Details
|
")
")
")
|
|
01-30-2011
|
2.00
|
Assembling right elevator skeleton
|
Details
|
")
")
")
|
|
01-22-2011
|
1.00
|
Elevator trim access panel
|
Details
|
")
")
|
|
01-22-2011
|
3.00
|
Dimpling and priming stiffeners and skins
|
Details
|
")
")
")
|
|
01-20-2011
|
2.00
|
Rolling the leading edge
|
Details
|
")
")
")
|
|
01-20-2011
|
2.00
|
Riveting the rudder trailing edge
|
Details
|
")
")
")
|
|
01-20-2011
|
1.00
|
Rivet the leading edge
|
Details
|
")
")
|
|
01-19-2011
|
2.00
|
Sand and shape the stiffeners
|
Details
|
")
")
|
|
01-19-2011
|
2.00
|
Elevator Skin Stiffeners
|
Details
|
")
")
")
|
|
01-16-2011
|
2.00
|
ProSealing the trailing edge
|
Details
|
")
")
")
|
|
01-15-2011
|
3.00
|
Riveting the skins to the skeleton
|
Details
|
")
")
")
|
|
01-15-2011
|
2.00
|
Riveting the rudder skeleton pieces to spar
|
Details
|
")
")
")
|
|
01-15-2011
|
1.00
|
Riveting reinforcement plates and nut plates to sp
|
|
")
")
|
|
01-15-2011
|
1.00
|
Prepping the trailing edge
|
Details
|
")
")
")
|
|
01-15-2011
|
2.00
|
Finishing the rudder horn assembly
|
Details
|
")
")
|
|
01-14-2011
|
3.00
|
Acid wash and Prime
|
Details
|
")
")
")
|
|
01-12-2011
|
1.00
|
Rudder counter-weight rib
|
Details
|
")

(Click Here to view Full Log Entry)")
|
|
01-12-2011
|
3.00
|
Dimpling and deburring
|
Details
|
")
")
")
|
|
01-11-2011
|
2.00
|
Match-drilling the rudder horn cover
|
Details
|
")
")
|
|
01-11-2011
|
2.00
|
Fabricating the bottom cap mounting strip
|
Details
|
")
")
|
|
01-09-2011
|
1.00
|
upper skeleton
|
Details
|
")
")
|
|
01-09-2011
|
2.00
|
Drilling and attaching skins
|
Details
|
")
")
|
|
01-09-2011
|
2.00
|
Back-riveting the stiffiners to the rudder skins (
|
Details
|
")
")
|
|
01-09-2011
|
1.00
|
Back-riveting the stiffiners to the rudder skins
|
Details
|
")
")
|
|
01-09-2011
|
2.00
|
Assembling the lower rudder skeleton
|
Details
|
")
")
")
|
|
01-08-2011
|
1.00
|
Priming the stiffiners and skins
|
Details
|
")
")
|
|
01-08-2011
|
2.00
|
Dimpling the rudder stiffiners and skins
|
Details
|
")
")
")
|
|
01-08-2011
|
4.00
|
Deburring the rudder skin and stiffiner holes
|
Details
|
")
")
|
|
01-05-2011
|
2.00
|
Stiffiners, final length check, cleco to skins
|
Details
|
")
")
|
|
01-04-2011
|
2.00
|
Trimming the stiffiners
|
Details
|
")
")
")
|
|
01-01-2011
|
9.00
|
Quick-build Wings and Fuselage arrive!
|
Details
|
")
")
|
|
12-12-2010
|
2.00
|
Riveting the aft spar into the vert stab
|
Details
|
")
")
")
|
|
12-12-2010
|
1.00
|
Riveting skins to forward spar and skeleton
|
Details
|
")
")
")
|
|
12-12-2010
|
4.00
|
Riveting aft spar to spar doubler
|
Details
|

(Click Here to view Full Log Entry)")
")
")
|
|
12-12-2010
|
1.00
|
Finishing the aft spar
|
Details
|
")
")
")
|
|
12-12-2010
|
1.00
|
Final 3 rivets....done!
|
Details
|
")
")
|
|
12-12-2010
|
1.00
|
Cleco the skins to forward skeleton
|
Details
|
")
")
")
|
|
12-12-2010
|
1.00
|
assembling the skeleton to forward spar
|
Details
|
")
")
|
|
12-05-2010
|
3.00
|
Acid Wash and Prime
|
Details
|
")
")
|
|
12-02-2010
|
3.00
|
Dimpling the ribs, spars, skins
|
Details
|
")
")
")
|
|
12-02-2010
|
1.00
|
Dimpling and countersinking the rear spar and doub
|
Details
|
")
")
")
|
|
11-30-2010
|
1.00
|
Hanging the skin and drilling
|
Details
|
")
")
")
|
|
11-30-2010
|
4.00
|
finishing the skeleton
|
Details
|
")
")
")
|
|
11-30-2010
|
1.00
|
Debur and start dimpling
|
Details
|
")
")
")
|
|
11-29-2010
|
2.00
|
Rear spar, doubler, and rudder hinge mounts
|
Details
|
")
")
")
|
|
11-29-2010
|
1.00
|
building the spar/rib skeleton
|
Details
|
")
")
|
|
11-28-2010
|
2.00
|
still skinning
|
Details
|
")
")
")
|
|
11-27-2010
|
1.00
|
Riveting the skins to the forward spar
|
Details
|
")
")
")
|
|
11-27-2010
|
1.00
|
Riveting the skins
|
Details
|
")
")
")
|
|
11-27-2010
|
7.00
|
Riveting ribs to the skin
|
Details
|
")
")
|
|
11-27-2010
|
1.00
|
Rivet the horiz stab end ribs
|
Details
|
")
")
|
|
11-26-2010
|
1.00
|
rivet the horizontal stab aft spar
|
Details
|
")
")
|
|
11-26-2010
|
1.00
|
rivet elevator bearing mounts to the rear spar
|
Details
|
")
")
|
|
11-26-2010
|
4.00
|
Rebuilding rear spar
|
Details
|
")
")
")
|
|
11-26-2010
|
1.00
|
Reassemble horizontal stab front spar
|
Details
|
")
")
|
|
11-26-2010
|
1.00
|
hanging the ribs
|
Details
|
")
")
|
|
11-23-2010
|
2.00
|
Horiz Stab: Acid wash prep for prime
|
Details
|
")
")
|
|
11-23-2010
|
2.00
|
Horiz Stab skin edge prep
|
Details
|
")
")
|
|
11-22-2010
|
2.00
|
Dimpling Horiz Stab skins part deux
|
Details
|
")
")
|
|
11-22-2010
|
3.00
|
Building the DRDT-2 cradle platform
|
Details
|
")
")
|
|
11-21-2010
|
2.00
|
Dimpling the Horiz Stab Skin, part one
|
Details
|
")
")
|
|
11-21-2010
|
2.00
|
Debur, Dimple Horiz Stab skeleton
|
Details
|
")
")
")
|
|
11-12-2010
|
1.00
|
Problem with Horiz Stab front spar
|
Details
|
")
")
|
|
11-11-2010
|
1.00
|
The big 4-thick drill!
|
Details
|
")
")
|
|
11-11-2010
|
1.00
|
horiz. stab skins
|
Details
|
")
")
|
|
11-11-2010
|
1.00
|
Horiz Stab--Disassembly and final front spar holes
|
Details
|
")
|
|
11-11-2010
|
1.00
|
horiz stab inboard ribs placement
|
Details
|
")
")
|
|
11-11-2010
|
1.00
|
drilling & attaching the horiz stab skins to the i
|
Details
|
")
")
|
|
11-11-2010
|
6.00
|
Assembling the horiz stab skeleton
|
Details
|
")
")
|
|
11-09-2010
|
1.00
|
Prepping the horiz stab ribs
|
Details
|
")
")
|
|
11-09-2010
|
1.50
|
Predrilling horiz stab inboard ribs
|
Details
|
")
")
|
|
11-09-2010
|
1.00
|
Notching the fwd inboard horiz stab ribs
|
Details
|
")
")
|
|
11-09-2010
|
1.00
|
Horizontal stab
|
Details
|
")
|
|
11-09-2010
|
1.00
|
Finishing horiz stab front spar
|
Details
|
")
")
|
|
11-08-2010
|
1.00
|
Tapering the Hor Stab front spar angle pieces' end
|
Details
|
")
")
")
|
|
11-08-2010
|
1.00
|
Rounding, tapering the Horiz Stab front spar angle
|
Details
|
")
")
")
|
|
11-08-2010
|
1.00
|
Hor. Stab front spar/angle pieces
|
Details
|
")
")
")
|
|
11-08-2010
|
3.00
|
Front spar channels
|
Details
|
")
")
")
|
|
11-08-2010
|
2.00
|
Finishing elev bearing assembly
|
Details
|
")
")
|
|
11-08-2010
|
1.00
|
Drawing the template for Horiz Stab front spar ang
|
Details
|
")
|
|
11-07-2010
|
2.00
|
Work has officially begun!
|
Details
|

")
")
|
|
11-07-2010
|
2.00
|
Positioning & match-drilling the elevator hinge br
|
Details
|
")
")
")
|
|
11-07-2010
|
2.00
|
Match-drill elevator rear spars to spar channel
|
Details
|
")
")
|
|
11-07-2010
|
2.00
|
Elevator bearing bracket assembly, priming
|
Details
|
")
")
")
|
|
10-30-2010
|
2.00
|
Tools!
|
Details
|
")
")
")
|
|
10-26-2010
|
1.00
|
Air Supply part deux
|
|
")
")
")
|
|
10-25-2010
|
0.00
|
The kit
|
Details
|
")
|
|
10-25-2010
|
2.00
|
Sorting the bits and pieces
|
Details
|
")
")
|
|
10-25-2010
|
6.00
|
Shop setup
|
Details
|
")
")
")
|
|
10-25-2010
|
2.00
|
Empennage Delivered!
|
Details
|
")
")
|
|
10-25-2010
|
6.00
|
Air supply, Benches, back rivet plate
|
Details
|
")
")
")
|
|
06-25-2010
|
0.00
|
Visiting the Mothership!
|
Details
|
")
")
")
|
|
06-25-2010
|
0.00
|
Demo Flight at the Van's Factory
|
Details
|
")
")
|